The Sims 2 - Part II
by OldGamesCracking
Game Specs
| Name | The Sims 2 |
|---|---|
| Release-Date | 9/2004 |
| Redump ID | 49162 |
| Protection | SafeDisc v3.20.020 |
| Cracked under | Win XP |
| Tested under | Win XP & Win 10 |
| Scene-Crack by | MONEY |
Needed Tools:
- Good Old PC (Windows XP)
- x32dbg
- Ghidra
- ProcMon
- The original Game-CD of course ;)
- Compiler, Dev-IDE and stuff (e.g. VisualStudio)
- The previous articles on SafeDisc
- Koffeinhaltige Kaltgetränke
Disclaimer
- The games are cracked for educational purpose and to regain compatibility with modern systems
- The games are more than 20 years old and can be found freely on the net via e.g. archive.org
- No parts of the game are distributed
Recap
In the last article we made it to the OEP of the game via breaking at the last call to VirtualProtect then manually setting a debug-check event (BLT_XXX) and finally following the tail jump.
Let’s have a short look at the JMP again:
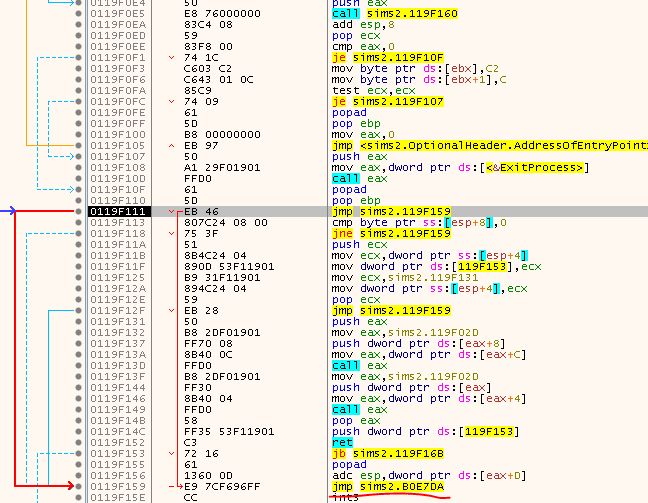
Keep the address of the first JMP in mind (0x119F111), restart the game and then have a look at that address. See that? It was always there, right from the start. It’s even super close to the entry point:
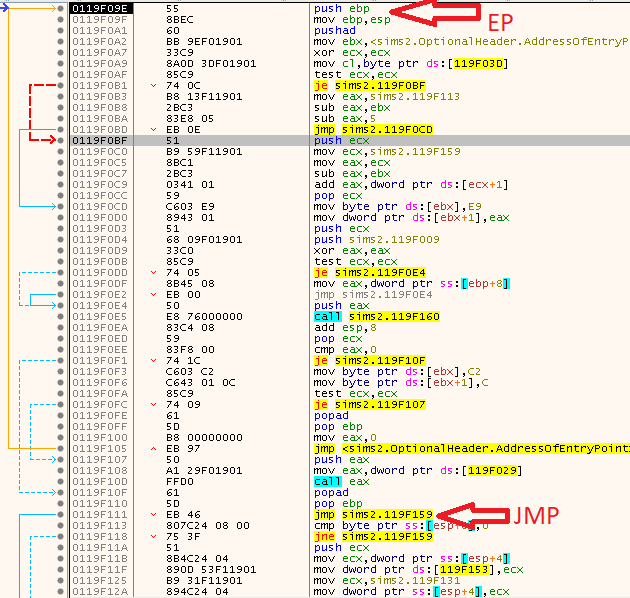
So it’s super easy to find the address of the OEP with a searchpattern. Just search for a “CALL EAX; POPAD; POP EBP; JMP XXX” and then follow the two jumps.
I have created a fully automatic script that also sets the event so you land right at the OEP. The only thing that’s missing is the handling of the anti-debugging checks, so use ScyllaHide or combine the script with the other scripts from the previous article.
How to Crack
Where I lied to you
Remember when I said that once we reach the OEP we have an unprotected/unpacked game in memory and all we need to do is dump it back to disc?
Guess what - that’s not quite true ;)
Of course, most of the game - like 99.999% - is in it’s final state now and if you’re just interested in a static code analysis you might even be at your destination, but for cracking the game and making it run without the CD it’s the remaining 0.001% that matters and which will keep you awake for countless nights. Fully cracking this game took me about two weeks (probably 100h+), but we will get to that ;)
For the moment, let’s go ahead and open Scylla (just ‘Scylla’, not ‘ScyllaHide’) and see if we could actually dump the game:
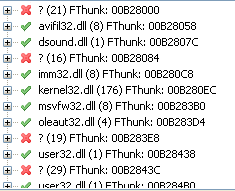
Well, that’s a mess! What happened here? Some of the imports seem to be broken :( Time to get our hands dirty and dive into SafeDisc’s many tricks to prevent us from dumping the game :)
Theory of Anti-Dumping tricks
Reaching the OEP can be trivial once you know what to look out for. Of course the authors of (game-)protections knew this and came up with methods to make the application undumpable. Usually the term ‘anti-dumping’ is a bit deceiving as in most cases there is no mechanism that stops you from dumping the game from memory back to disc. It’s rather an ‘anti-loading’ mechanism as it will prevent the dumped game from properly starting up. If - for example - the IAT is messed up, Windows won’t even try to start the application and it fails instantly. It’s a bit like the term ‘copy protection’ with which most game CDs are marketed. Many (if not all) game discs do not have a protection that stops you from copying the data, it’s usually the copy-software that fails to produce an exact copy as it only copies the userdata but not stuff like subchannel-data etc., but that’s another topic.
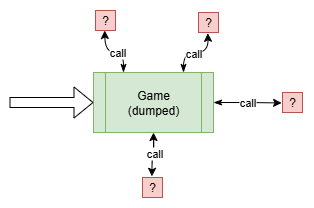
So, why won’t the dumped game start - even if you dump it exactly byte by byte? The most common trick here is to outsource parts of the game to temporary buffers that will be lost once you re-start the dumped game.
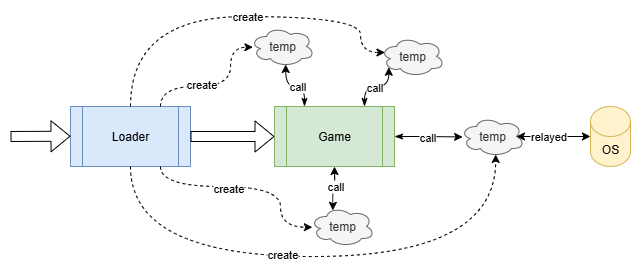
Especially replacing addresses in the IAT that normally point to a library function (e.g. the WinApi) with addresses of intermediate temporary buffers - usually referred to as ‘stubs’ - is a common trick that probably every packer/protector uses since it’s very easy to do and requires no altering of the application code itself (besides the thunks in the IAT).
One could ask now, why don’t we just also copy the temporary buffers back to disc? I must admit that I don’t have a good answer for that. I can imagine that it would - in theory - also work under certain conditions but there are things we can not control like the process-ID, the CPU-ID and the addresses of the dynamically loaded libraries which sometimes get hardcoded into these stubs. So we would need to update these features/fingerprints deep within the code of the temporary buffers which in turn would mean we had to fully reverse the protector to the very last bit which does not seem like a viable task. Better restore the game to it’s original state and strip the protector as much as possible without trying to understand it’s inner workings ;)
In order to remove a protection from an applications one needs to figure out where these ‘stubs’ are and re-create the original app-code. The stubs usually come in different flavors so it can take some while until you have found and defeated each and every one.
Intermodular Calls
The easiest stubs to spot and repair are usually stubs that relay intermodular Calls. They have at least two properties that make them stand out. First, they usually use indirect Calls via the IAT so it’s always a good idea to have a look at that. Second, they end up in well-known places (WinApi etc.) and also cross memory-page borders during the call, so the transition from the stub to the final destination is most of the time easy to spot and distinguish.
For these reasons, let’s have a look at them first.
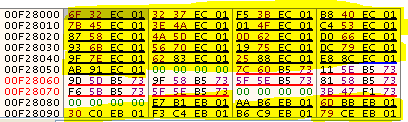
Remember when we opened Scylla and it showed some broken imports? The first one is located at 0x00F28000 - the first entry in the IAT. Search for references to that address to find an actual call that uses this thunk and you should find this promising piece of code:

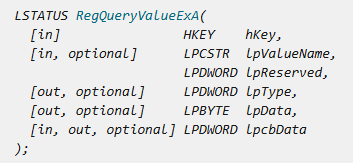
As you can see there seem to be six parameters being pushed onto the stack, but x32dbg fails to identify the name of the call location because a random stub in some temporary memory location is being called instead of the original library function. Can you guess the original library function already just by looking at the parameters?
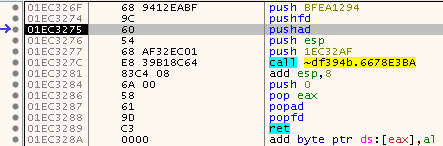
Having a look at the code of the stub we see a classic setup:

First, all registers are being saved onto the stack and then there is another Call that leads deeper into the SafeDisc-Rabbithole.
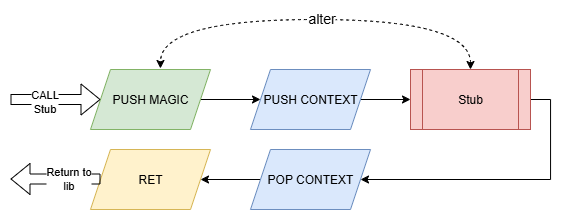
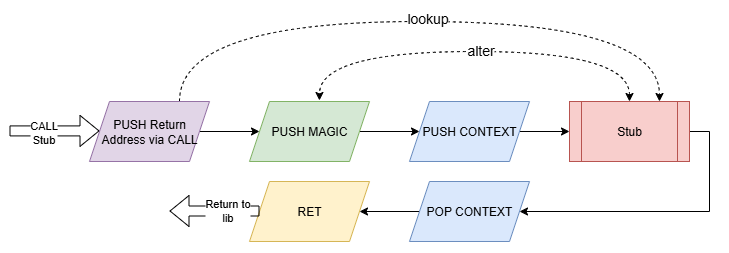
Afterwards the registers are being restored. But have a closer look. See that there is a preceeding PUSH 0xBFEA1294 without a corresponding POP? In theory this PUSH, combined with the RET at the end of the stub would create an implicit JMP instruction. So it would work like this:
- A magic value is pushed onto the stack
- All registers (hence the ‘context’) are pushed onto the stack
- The SafeDisc code somehow alters to magic value, so afterwards it will hold the true address of the lib function
- The context is popped back
- We land in the lib function via the
RET(implicitly popping the now altered magic value)
Interestingly this is not how it works. Or at least the second part after the inner stub is located somewhere different then where you think it is.
Go ahead and see for yourself. Put a breakpoint (HW or SW) on any instruction after the Call to the inner stub at 0x6678E3BA. It will never trigger as this code is never executed. I don’t really know why, I guess the code is either there to fool us or used for other scenarios as we might see later. Or it was just put there automaticly by the compiler.
But how can we deal with that? How can we find the true location where the context is restored and the RET is performed (without reversing the inner stub since we’re lazy, of course)?
Well, think about it for a moment. The SafeDisc stuff needs to be as transparent as possible. It can not change register values or values on the stack or even push stuff on the stack without resetting everything back to it’s original state afterwards. So at some point - for instance - ESP must be reset to the same value as when we entered the stub. We can ‘monitor’ the exact moment when that happens by a cleverly placed hardware breakpoint.
The method is as follows:
- Within the stub, single-step over the first few instructions until you’ve stepped over an instruction that saves part of the ‘context’ (usually
PUSHADorPUSHFD) - Now place a hardware breakpoint (on access, DWORD) on the top of the stack (“bphws esp, a, 4”)
- Let the program run freely
- If everything works well, the hardware breakpoint should trigger now
- Single-step until you reach a
RET(in most cases it’s the very next instruction) - The true address is on the top of the stack now
This will be our attack-vector for nearly all SafeDisc stubs that we will encounter down the road.
Let’s see that in action:
Point EIP to the original Call-Location at 0x00C7936A (important!) and single-step three times until you’ve stepped over the PUSHFD.
Now place a HW breakpoint on the top of the stack and hit F9. You should land here:

Aha! This is the real place where the context gets restored and we are already at a RET, so let’s have a look at the value on the top of stack now:

This time x32dbg is able to recognize the address and we can see that the game initially tried to Call RegQueryValueExA which lines up with the six parameters that were pushed onto the stack earlier. (Did you guess correctly?)
As you can see, it’s not super complicated to restore the intermodular calls. The inner mechanisms of the SafeDisc stub can be blackboxed and we can now just go through the IAT, look out for suspicious addresses and perform the trick we just saw on each of them.
Having a look at the IAT we can already see the other stubs as they are roughly in the same address space:
So let’s imagine we would write a script that did the following:
- Go through the IAT and check for suspicious addresses
- For every address, perform the steps described above
- Write the acquired original address back to the IAT
This is pretty much what I did for GTA 2.
But before we start writing a script, let’s try to perform the steps one more time manually. So reset everything back to the original state after we unpacked the game (did you make a snapshot of the VM at the OEP?) and pretend nothing happened. Now point EIP to the start of the first stub (0x01EC326F as seen in the image above), and perform the previously discussed steps (single step two times until you step over PUSHFD etc.). Where do you land? Probably here?

Why is this so? Why isn’t RegQueryValueExA called anymore? Well, since some version of SafeDisc (probably v2.x) they use the return address of the calling code as a kind of lookup to figure out the actual address of the library function. This means that one and the same stub may get called from many different locations but ends up in a different procedure.
In my GTA 3 article I figured out that while there are multiple first-level stubs, the core-code (Resolver) is always the same, I guess this applies to this game also.
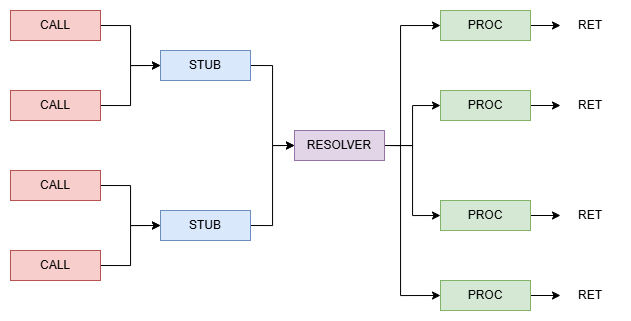
One could complete the image from above like this now:
This in turn means that we can not just simply scan the IAT, we need to figure out the address of each CALL-instruction (FF 15) within the game code and perform the described steps from there.
In order to get out of this misery there are two options:
- Reverse-Engineer the inner bits of the ‘Resolver’ and hope to find some kind of list with all the Call/Return-addresses
- Scan the whole text section for intermodular calls and fix them one by one
or alternatively
- Go through the IAT and for every entry, find all Calls that use that thunk
Once you have figured out all addresses, you can restore the IAT. It’s usually a good idea to first remember all original proc-addresses in a seperate list/buffer and then restore the IAT in one go.
Both of the aforementioned options have their pros and cons. The first option might seem to be the better way, but with the knowledge I have gained with working on other parts of SafeDisc, I’m pretty sure there is no simple list we can just step through. Spoiler: There will be most definitely a hashmap that maps the hashed return address to the address of the library function. So even if we find said list, we would still need to bruteforce the return addresses to get the address of the procs. Also there might be added fake-entries to fool us if we would go blindly through the list.
The second option seems easy at first but then you realize that scanning raw binary machine code for specific instructions is no trivial task since a simple binary searchpattern will turn up many false-positive results that one needs to filter out. Also relying on x32dbg to figure out the instructions for us e.g. via the script-command ‘findasm’ will not always work for some parts of the code without a clear execution path to them as debuggers usually fail to properly parse these parts (although x64dbg does a good job at trying to parse them anyways).
Anyways, let’s not loose hope. If your’re interested on how to fix the intermodular calls via a x32dbg-script, read the GTA 3 article.
For this game, I will use a slightly different approach, but to understand the idea, we will need a bit more background information. So I decided to conclude the article at this point and we will continue in Part 3.
tags: The Sims 2 - Game Cracking - Reverse Engineering - SafeDisc