The Sims 2 - Part I
by OldGamesCracking
Game Specs
| Name | The Sims 2 |
|---|---|
| Release-Date | 9/2004 |
| Redump ID | 49162 |
| Protection | SafeDisc v3.20.020 |
| Cracked under | Win XP |
| Tested under | Win XP & Win 10 |
| Scene-Crack by | MONEY |

Needed Tools:
- Good Old PC (Windows XP)
- x32dbg
- Ghidra
- ProcMon
- The original Game-CD of course ;)
- Compiler, Dev-IDE and stuff (e.g. VisualStudio)
- The previous articles on SafeDisc
- Koffeinhaltige Kaltgetränke
Disclaimer
- The games are cracked for educational purpose and to regain compatibility with modern systems
- The games are more than 20 years old and can be found freely on the net via e.g. archive.org
- No parts of the game are distributed
Foreword
A while ago I saw Nathan Baggs’s video on this game. While he managed to reverse large portions of the SafeDisc loader, he was not able to make the game run without the CD. He actually didn’t even make it till the OEP. Since this is where the actual fun-part begins and some of his viewers might be interested in the topic, I decided that for this article, I will do a full walk-through and might go through some of the aspects that I have already discussed in previous articles.
Please note: Cracking a game protection is no simple or easy task! This article will be tech-heavy and I can not explain every aspect to the very last detail. If you are interested in the general topic of defeating old game protections and need a place to start, have a look at my older articles. I go through the games roughly in chronological order and since the protections got trickier over the time, as a rule of thumb you can say: the older the game, the easier to crack ;)
By the way, I recently learned about the SafeDiscLoader project which can load a SafeDisc protected game - even if the original CD is not present and even on modern systems. It’s based upon the Universal Safedisc and SafeCast Loader by RELOADED. I’m not fully sure how it works, my guess would be that they figured out the decryption key that is normally derived from the game CD. The key seems to be the same for every SafeDisc title and thus one can hard-code it and write a generic loader - absolutely astonishing and it works surprisingly well!
So, depending on your tech-level, I can recommend the following options for playing your old games (on modern systems):
- Use the SafeDiscLoader
- Use SafeDiscShim (still requires the original CD)
- Find a scene-crack
- Check Gog.com or similar
- Make your own crack
Setup
The protection of this game (SafeDisc) makes use use of drivers that were blacklisted by Microsoft and do not run under modern Windows anymore. There are tools like SafeDiscShim that try to circumvent this issue and as far as I know it’s possible to disable the Driver Signature Enforcement to make SafeDisc protected games work under modern Windows, but I have not yet tested these methods, so I stick to my current setup of running Windows XP in a Virtual Machine and trying to make the game run inside the VM. This adds at least one advantage and one problem to the mix ;)
The advantage is that you can make a snapshot of the VM once the game is loaded so you do not need to wait for the SafeDisc loader to spin up the CD and read and decrypt it’s content which can sometimes take quite some time. Also some games are already dying of Disc rot which makes them start only after a few attempts, so you can make the process a bit more consistent. And lastly, you will not create a perfect crack on the first try, so you will need to restart the game countless times, hence a snapshot can save a lot of time here :)
The disadvantage of using a VM is that some games won’t start due to the lack of a proper graphics card.
How to Crack
Theory of Game Cracking
Most - if not all - disc-based game protections (of old games) work in the following simplified fashion:
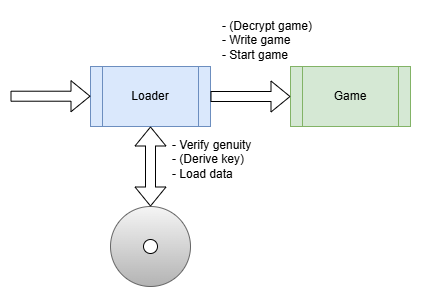
So there usually is a piece of software (the loader), that tries to figure out if a genuine CD is present via various methods (Subchannel Data, Faulty Sectors, Twin Sectors, Data Position Measurement …). Then a key is derived from these specific characteristics of the CD which then in turn is used to decrypt the game. Once everything is properly set up, the game is started by the loader.
One misconception that I had about game protections and the cracking process is that the protection was part of the game itself and that you need to understand the inner bits of the loader-part. While it might be of help to know it’s inner mechanisms, as you can see in the graphic above, the loader is a seperate piece of software, sometimes a completely different .exe and you actually need to know (nearly) nothing about it. You can - and should (for your sanity) - completly skip it and just try to figure out the transition point, the place where the game is fully loaded and ready to start. If we manage to step into the action right at that transition point we should (in theory) have an unprotected game (either in RAM or on the hard drive) and can extract it.
As reality has it, there is actually a lot more to it but in general, this is what the general cracking process looks from a distace: Stopping at the transition point and extracting the game. In fact, this not only applies to games but to protected/packed software in general.
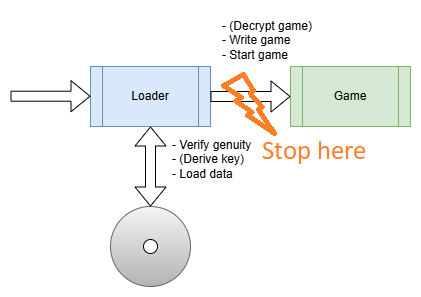
So this is what we need to do first: Stopping at the transition point. This point is actually called the OEP - Original Entry Point - as it’s the Entry Point (start address) where the original application (the game) starts to execute.
Generally speaking, there are three ways of how a loader sets up and starts the application.
First, there is the straight-forward approach of simply starting a new process from a file on the hard drive. In the most simplistic scenario the file is not even encrypted at all. But most of the time, an encrypted file is used.
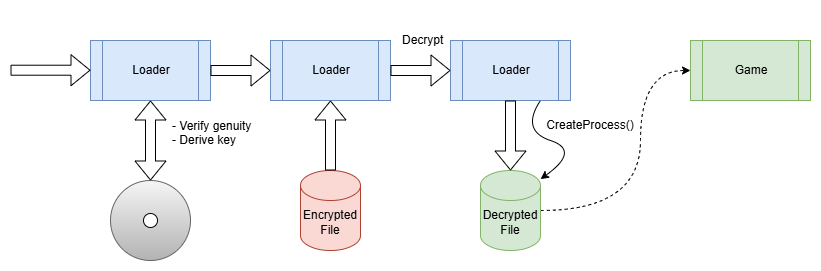
This is what e.g. early versions of SafeDisc did. You can see this in action in my article on GTA 2.
A second common method is to embed the application into the loader, decrypt it in memory and then write it to disc.
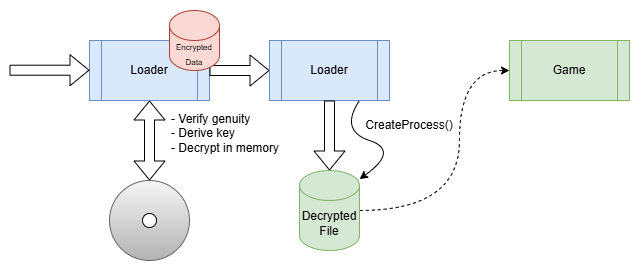
The technique is the same as in a malware dropper.
The third common method is to add the loader to the original application file, encrypt or somehow mess up the original app code and alter the .exe so that upon startup it will instead call the loader code. The loader will then un-mess the original content and when it’s done, jump to the formerly mentioned OEP.
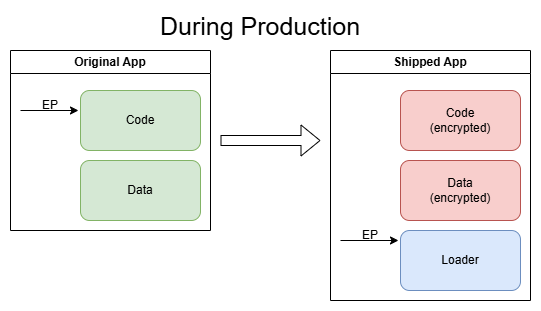
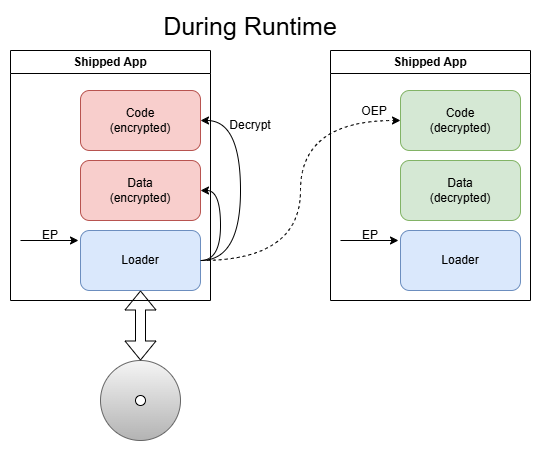
BTW, the transition to the application is known as the “OEP Jump” or “Tail Jump”.
The last mentioned method of embedding everyting in one file has the advantage that it leaves a bit less traces as no Calls to e.g. CreateProcess, WriteFile etc. are needed, but the setup is a bit more complicated as the protection-loader needs to perform the steps that the application-loader of the Operating System would usually perform under normal conditions (setting up the IAT, LoadLibrary, GetProcAddress etc.).
Where to start?
In order to find out which method is used, we could throw the game in a debugger now and try to step through the mess or we could watch the situation from a bit further away and have a look at things with ProcMon first to get an overview of what the game protection is doing. Note that current versions of ProcMon stopped working under Windows XP, (one of) the last version(s) that works under Win XP is v3.10 which I will be using here.
So start up ProcMon, add filters if needed, start the game and have a look around.
Scrolling through the log, we can roughly see three phases. In phase 1 the game reads chunks of it’s own memory and writes it to some temporary files:
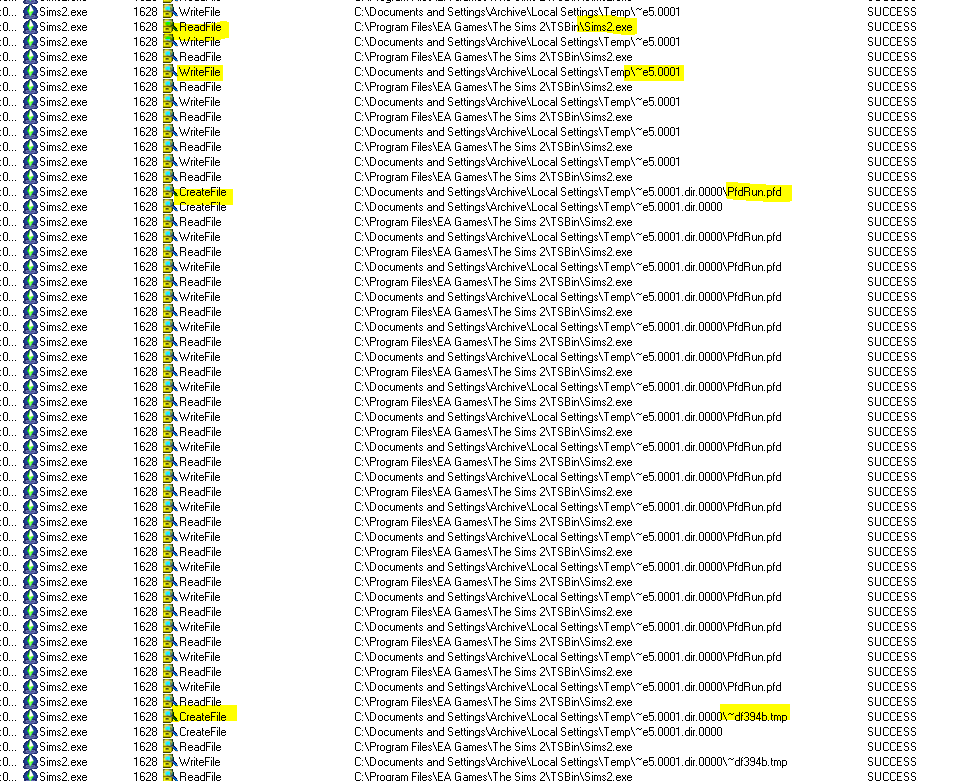
One of the files is then started as a new process.
We will see their meaning later, but for now, let’s not worry too much about them.
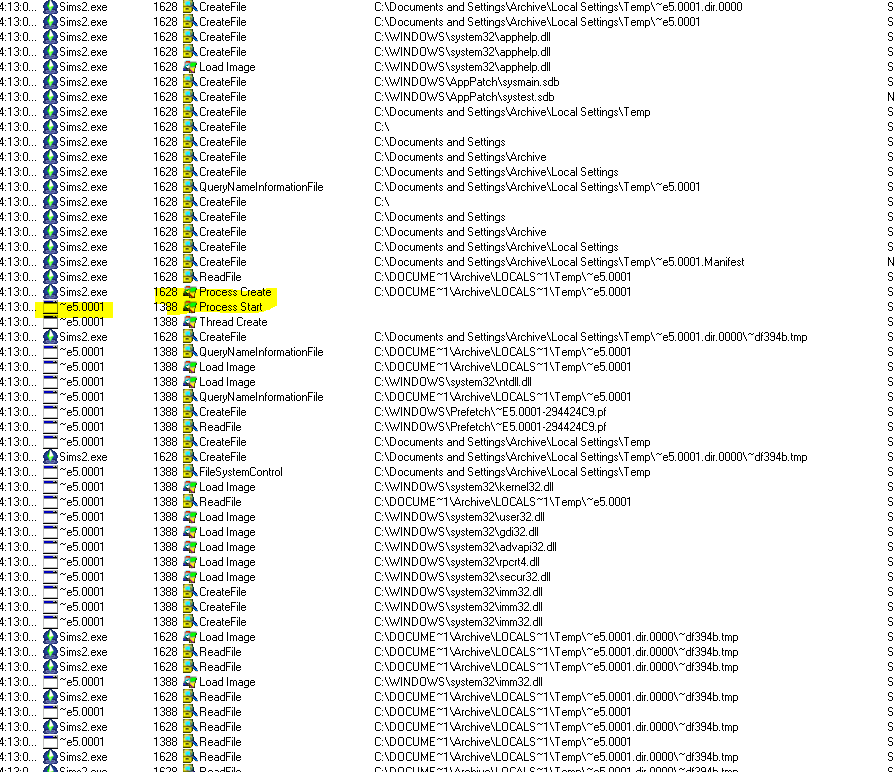
In Phase 2 the game locks the CD tray and sends raw SCSI commands to the CD drive. This is probably the phase where the genuinity of the CD is verified and the decryption keys are derived.
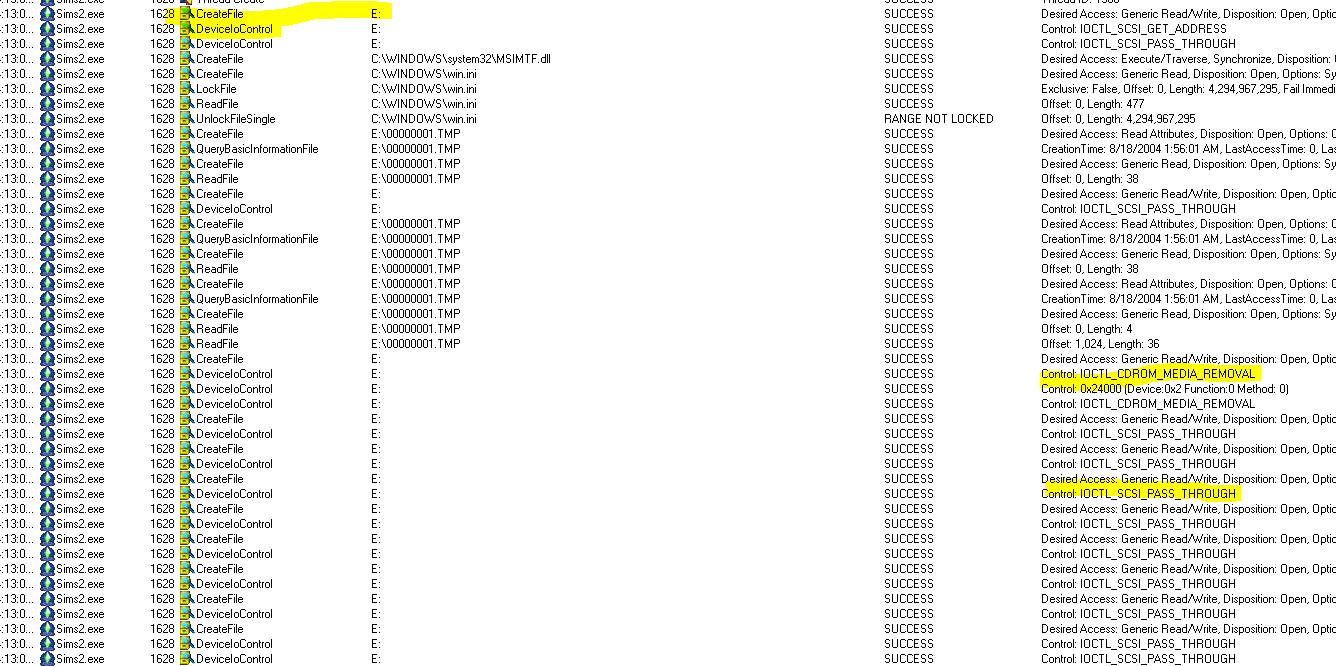
Finally, one can notice that after the last SCSI command has been sent, the game instantly starts to load files that look like they belong to the game itself which is a sign that this is the place where the OEP jump has happened.
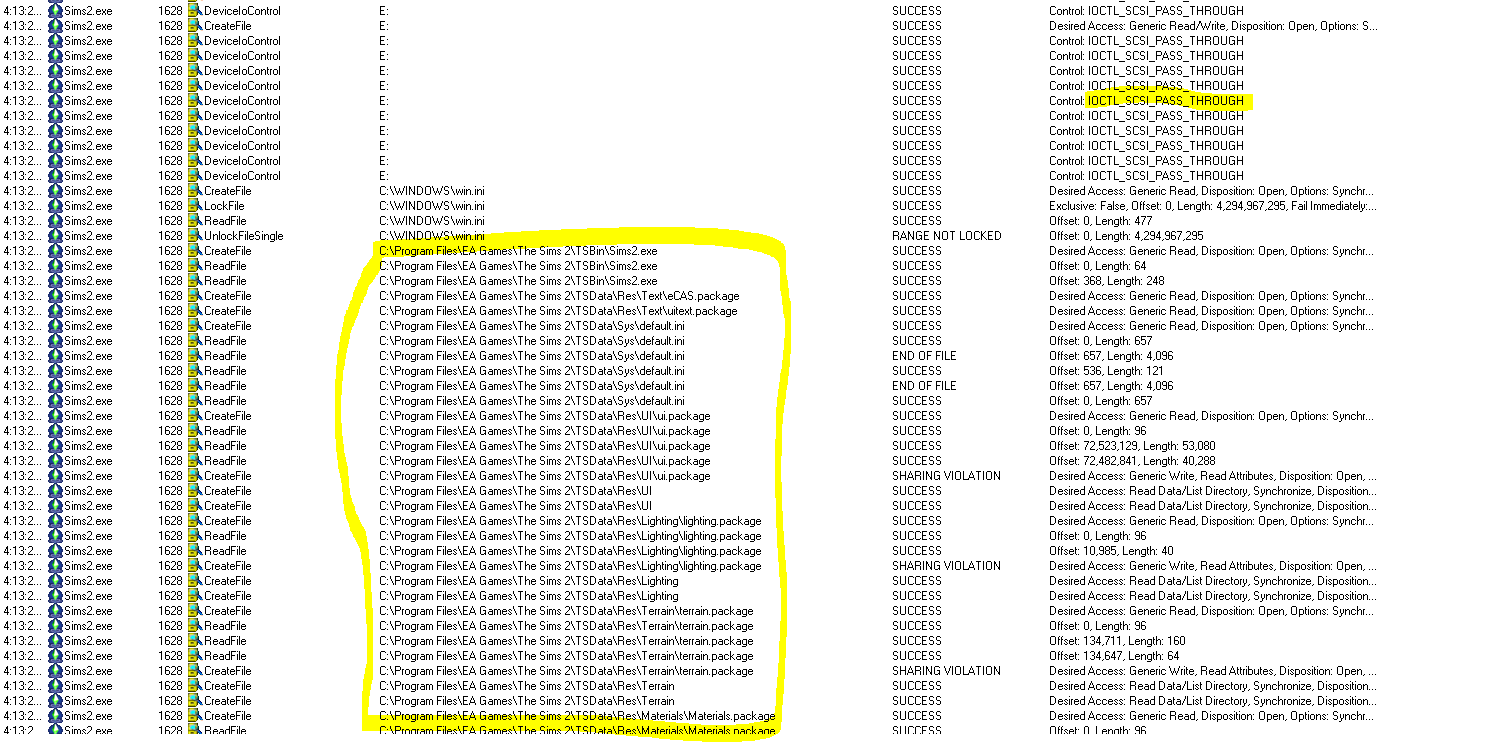
So for now we can conclude that this game uses a ‘Type 3’ loader as we discussed earlier and we can now try to find the tail jump.
Finding the OEP
Finding the OEP is really a classic task in reverse engineering that is not unique to game cracking. You can find many articles online. If you want to get a start into the topic, have a look at this UnpackMe Collection, it’s a good place to start and train your skills on all difficulty levels.
In general, you can approach (find) the OEP from two sides. Either by finding the code that is executed at a very late stage of the loader or by finding the code that is executed very early in the unpacked application. Both have their pros and cons.
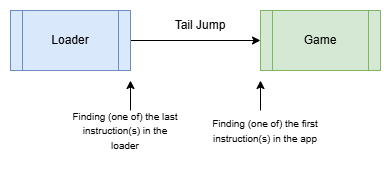
Approaching the OEP from the late stage of the loader is usually the better idea as you can make sure to not miss any instructions. And once you are dealing with packers that intentionally ‘steal’ bytes from the entry point of the app, you need to use this method.
The traditional way to find the end of the loader is to look out for WinAPI-Calls that - for example - write the (decrypted) application data (WriteProcessMemory), set the protection flags of the written data (VirtualProtect), perform the loading of the app (LoadLibrary, GetProcAddress) or do some cleanup stuff (LocalFree, VirtualFree, HeapFree, …).
Finding the OEP after the app has already started can be somewhat easier as some compilers integrate very specific Calls at the start of the app. For example GetVersion, GetModuleHandle or GetCommandLine are always a good candidate if you deal with targets that have been compiled with VisualStudio.
The huge downturn of this method is that while you might find code that looks like the start of a routine (PUSH EBP at the start etc.), it might actually not be the OEP and there were preceeding instructions that you’ve missed. But at least you get an idea where the OEP might be.
Seeing stuff in action
Ok, now that we have talked so much about the theory, let’s hop into the action and load the game.exe in the debugger. As a short sidenode: x64dbg ceased support for Win XP with the June 2025 version, so I’m still using the “Mar 15 2025” version.
As expected - if you have ScyllaHide disabled for more fun - we will instantly see this message:
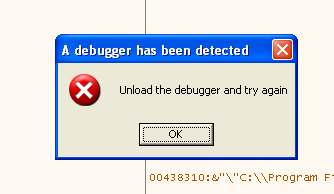
Of course they have added a debugger check ;) The only question is, which of the many methods did they use? You can see how Nathan figures out the used methods in his video or you can read my GTA 2 article since the methods didn’t really change since SafeDisc v1. Or - if you are lazy - you can just use ScyllaHide and (un)tick options until you have isolated the necessary anti-anti methods.
For SafeDisc v1-v3 three methods are used:
- First, the classic check of the BeingDebugged flag in the PEB-Struct (manually or via IsDebuggerPresent) which is very easy to defeat, you just have to overwrite the flag.
- Second, NtQueryInformationProcess is used with ProcessInformationClass being set to 7 (ProcessDebugPort) which is also easy to defeat, you just have to make sure to only alter the return value for queries to ProcessDebugPort since other queries should be left untouched.
- Third, a somewhat ancient method is used called “MeltICE” that was introduced by David Eriksson way back in 1997! It detects SoftICE a famous kernel mode debugger back in the days. Since we use a completely different debugger, we don’t have to take care of that.
Maybe there is more stuff, but once we have defeated the two main checks, we are good to go.
To defeat them, one could try to find all locations where the checks are being used and patch the exe but that would probably trigger CRC-Checks so we better not change anything. Instead, we are going to use the capabilities of x64dbg and write a nice little script. To defeat the PEB-check, we can use the following script:
$peb_addr = peb()
byte:[$peb_addr + 2] = 0
This simply un-sets the BeingDebugged flag. To kill the NtQueryInformationProcess check, we need to hook the Calls to that API, check if ProcessInformationClass is set to 7 and if so, we simply return FALSE. Luckily, this can all be done with x64dbg and a few lines of code:
$addr_NtQueryInformationProcess = NtQueryInformationProcess

bphws $addr_NtQueryInformationProcess, x, 1
bphwcond $addr_NtQueryInformationProcess, "arg.get(1)==7"
SetHardwareBreakpointSilent $addr_NtQueryInformationProcess, 1

loop:
	erun
	cmp eip, $addr_NtQueryInformationProcess
	jne end
	$pi = dword:[esp+0x0C]
	rtr
	dword:[$pi] = 0
	jmp loop

end:
Actually, this is not really ‘hooking’, just a hardware breakpoint and a bit of script-magic, but it works well enough since SafeDisc does not kill HW breakpoints (unlike SecuROM).
Unfortunately the script uses the erun command which will execute the program automaticly so we can not manually step anymore, instead we need to fast-forward to a well-known place via a breakpoint. As a first crude test to see if our anti-anti script works, let’s use the previously discussed VirtualProtect and count how many times that API is called. You can find the script here.
The script runs forever (about 5 minutes) and after more than 70,000 calls to VirtualProtect these are the last few log entries:
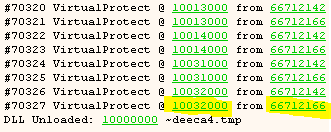
After this last call to VirtualProtect the game somewhat freezes or at least does not seem to progress, but we will ignore that for now. All that matters is that the loadscreen turned up (and closed) and the CD also spun up, so it seems like we were able to bypass the anti-debugging techniques with just a few lines of x64dbg-script :)
The assumption we can make now, is that the last Call to VirtualProtect is already very close to the OEP so let’s try to break there and manually step out. If we’re lucky there are no more anti debugging checks at that late state of ther loader and we can safely single-step through the code.
In order to break at that specific call, we simply alter the script a bit and add an additional condition to only break if the first argument (lpAddress) is equal to 0x10032000 (the last address, as seen in the image above).
Once we arrive in VirtualProtect, we simply step out a few times and step over any Call until we land on this bit:
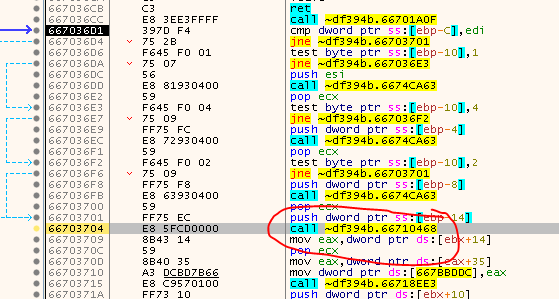
If you try to step-over this call, the game goes into the weird hibernation/freeze mode we observed earlier. So what’s that about? Step into the Call and observe the next few instructions a bit:
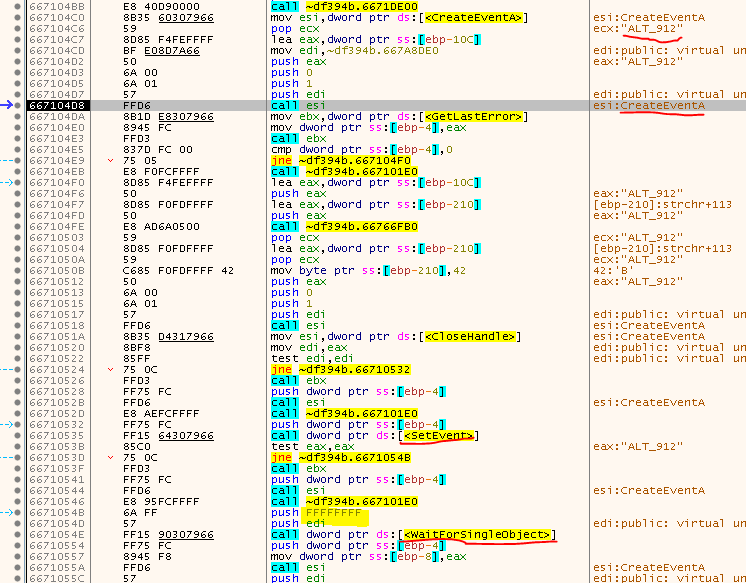
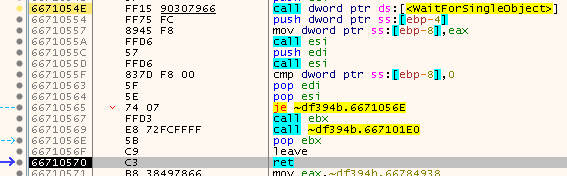
So, first an event called “ALT_XXX” is created (XXX is replaced with the PID of the process), then another event - called “BLT_XXX” - is created. Then the ALT event is set/signaled and finally the game waits indefinitely (0xFFFFFFFF) for the BLT event to be set.
Ok, cool. Now we have at least found the spot where the game freezes as WaitForSingleObject does not seem to return. But why is that so? This is actually another anti-debugging trick that relies on the fact that only one debugger can be attached to a program at the same time. Do you remember when we saw in ProcMon that another process was created?

This process is actually responsible for this misery and it goes something like that:
- The game.exe creates another process, let’s call it debugger.exe (real name is ‘~e5.0001’) and passes it’s PID to it.
- The game.exe creates two events. One called ALT_{PID} and the other BLT_{PID}, both un-set initially.
- The game.exe sets the event ALT_{PID} (to signal that it wants to be debugged) and then waits for BLT_{PID} to be set.
- The debugger.exe detects that ALT_{PID} has been set and now tries to attach to game.exe as a debugger.
- Since we already debug the game.exe with x64dbg, the debugger.exe can not attach and thus will never set BLT_{PID}.
- game.exe waits indefinitely for BLT_{PID} to be set and thus hangs.
To get out of this, the easiest way is to (manually) set dwMilliseconds of WaitForSingleObject to zero so it will instantly return. We also need to set the return value to zero (WAIT_OBJECT_0) otherwise it will return 0x102 (WAIT_TIMEOUT) and the game will terminate. Once we bypass WaitForSingleObject we can leave the function without any problems:
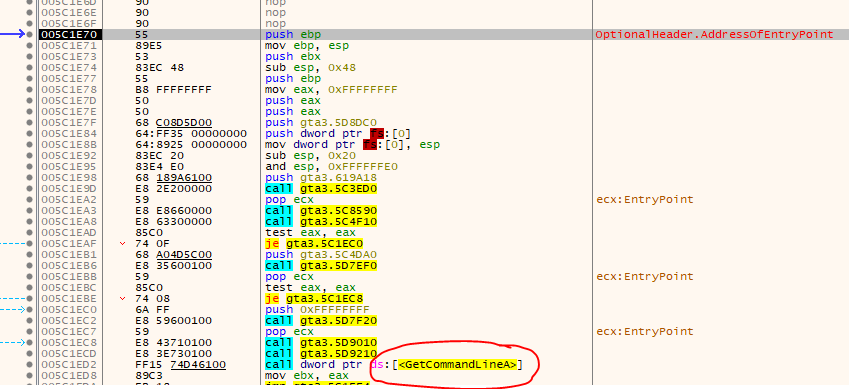
Then after a few more steps we land on these two jumps:
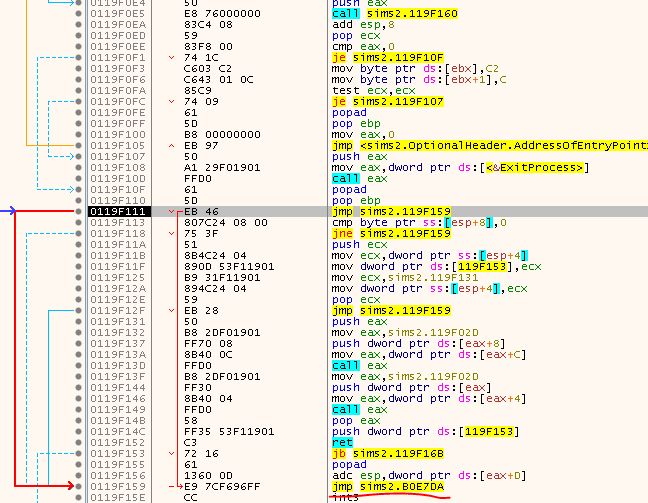
Have a close look and see how far the second one jumps! Follow it and and have a look around:
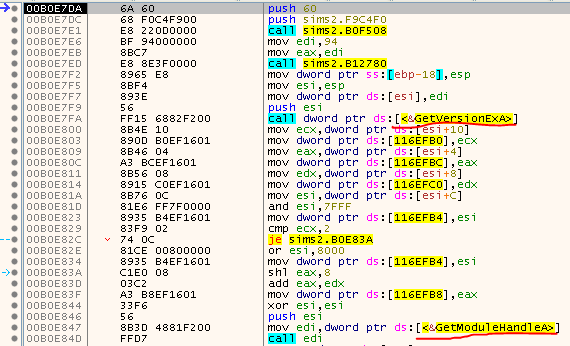
Do you recognize the code? This looks like a typical setup code that you’ll find at the Entry Point of many programs.
So we’ve made it - we’ve just followed the formerly discussed tail jump and are at the OEP - Yay ;)
The game is now unpacked and all that’s left is to dump it and SafeDisc is gone, right?
Well, the journey just started… more on that in part 2

tags: The Sims 2 - Game Cracking - Reverse Engineering - SafeDisc