The Sims 2 - Part V
by OldGamesCracking
Game Specs
| Name | The Sims 2 |
|---|---|
| Release-Date | 9/2004 |
| Redump ID | 49162 |
| Protection | SafeDisc v3.20.020 |
| Cracked under | Win XP |
| Tested under | Win XP & Win 10 |
| Scene-Crack by | MONEY |
Needed Tools:
- Good Old PC (Windows XP)
- x32dbg
- Ghidra
- ProcMon
- The original Game-CD of course ;)
- Compiler, Dev-IDE and stuff (e.g. VisualStudio)
- The previous articles on SafeDisc
- Koffeinhaltige Kaltgetränke
Disclaimer
- The games are cracked for educational purpose and to regain compatibility with modern systems
- The games are more than 20 years old and can be found freely on the net via e.g. archive.org
- No parts of the game are distributed
Recap
In the last article we stumbled upon some strange calls. They were clearly some SafeDisc shenanigans, but up until that point it was not clear what their purpose was. At first I thought they were some emulated jumps as I had seen in previous versions of SafeDisc, but at some point I realized that a much more complicated thing was going on. In total it took me roughly two weeks to fully get behind the details and come up with a solution on how to properly handle the situation.
Prelude: Overloaded Template Hell
As it seemed more and more clear to me, that I had to reverse engineer parts of the SafeDisc code, I started to step through the mess but after some time I hit an unpleasent roadblock that took me some while to figure out. There are many little functions sprinkled all over the place that all seem to do more or less the same thing. They all shuffle values around, use function pointers (V-Tables) to do things and in the end they are just there to store a single value in some struct - e.g. a single uint32_t, but everything is super convoluted. My guess is that they made the live of the reversers much harder by replacing basic types like uint32_t with a class template / value container. Moreover the value gets constantly encrypted/decrypted.
So instead of doing this:
uint32_t a = 1;
uint32_t b = 2;
uint32_t c = a + b;
They replaced it with the following:
Value<uint32_t> a = 1;
Value<uint32_t> b = 2;
Value<uint32_t> c = a + b;
And the underlaying class looks as follows:
template <typename ClassT>
class ValueEncrypted
{
private:
    ClassT _Value;

    ClassT encrypt_decrypt(ClassT v)
    {
        ClassT Key = 0x12345678;// This seems to vary

        return v ^ Key;
    }

public:
    ValueEncrypted(uint32_t v = 0)
    {
        (*this) = v;
    }

    template <typename T>
    operator T()
    {
        return encrypt_decrypt(_Value);
    }

    template <typename T>
    void operator =(T v)
    {
        _Value = encrypt_decrypt(v);
    }
};

template <typename ClassT>
class Value
{
private:
    ValueEncrypted<ClassT> _Value;

public:
    Value(ClassT V = 0)
    {
        _Value = V;
    }

    template <typename T>
    operator T()
    {
        return _Value;
    }

    template <typename T>
    void operator =(T v)
    {
        _Value = v;
    }

    template <typename T>
    T operator +(T v)
    {
        return (T)((ClassT)_Value + (ClassT)v);
    }

    template <typename T>
    T operator -(T v)
    {
        return (T)((ClassT)_Value - (ClassT)v);
    }

    template <typename T>
    T operator <(T v)
    {
        return (ClassT)_Value < v;
    }

    template <typename T>
    T operator >(T v)
    {
        return (ClassT)_Value > v;
    }

    template <typename T>
    bool operator ==(T v)
    {
        return _Value == v;
    }
};
This adds near to no complexity for the developers but boosts the time for reversing quite a lot. I ‘solved’ it by stepping into the many little functions, renaming them in Ghidra and at some point it started to make a bit more sense. But still, it’s a mess and makes reading the code a lot harder.
From afar
It may or may not be clear at this point that the calls we saw earlier represent emulated instructions - hence they are entry points to the Virtual Machine of SafeDisc.
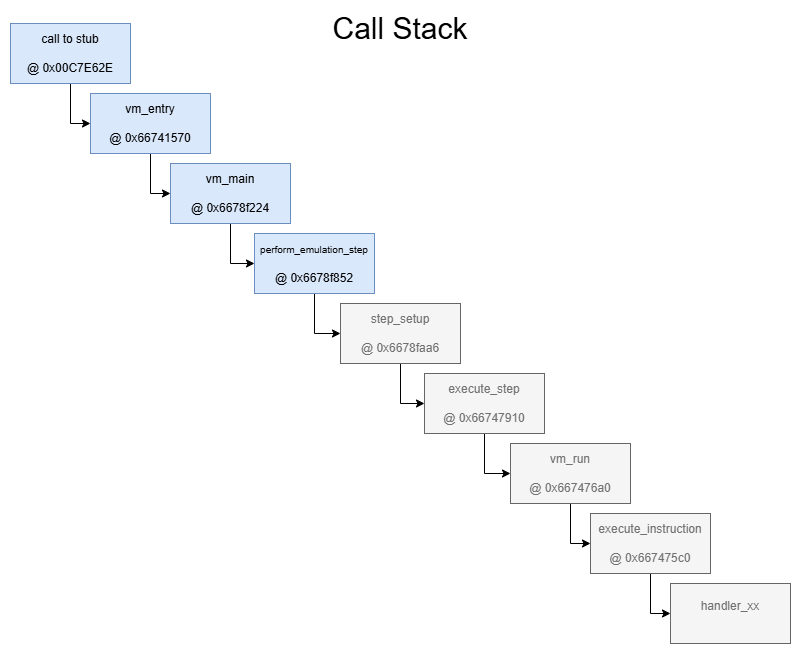
Usually I like to write my articles in an ‘exploration’-style so you can follow the steps I took, but this time I start with the final result. This is what the schematic of the VM looks like:
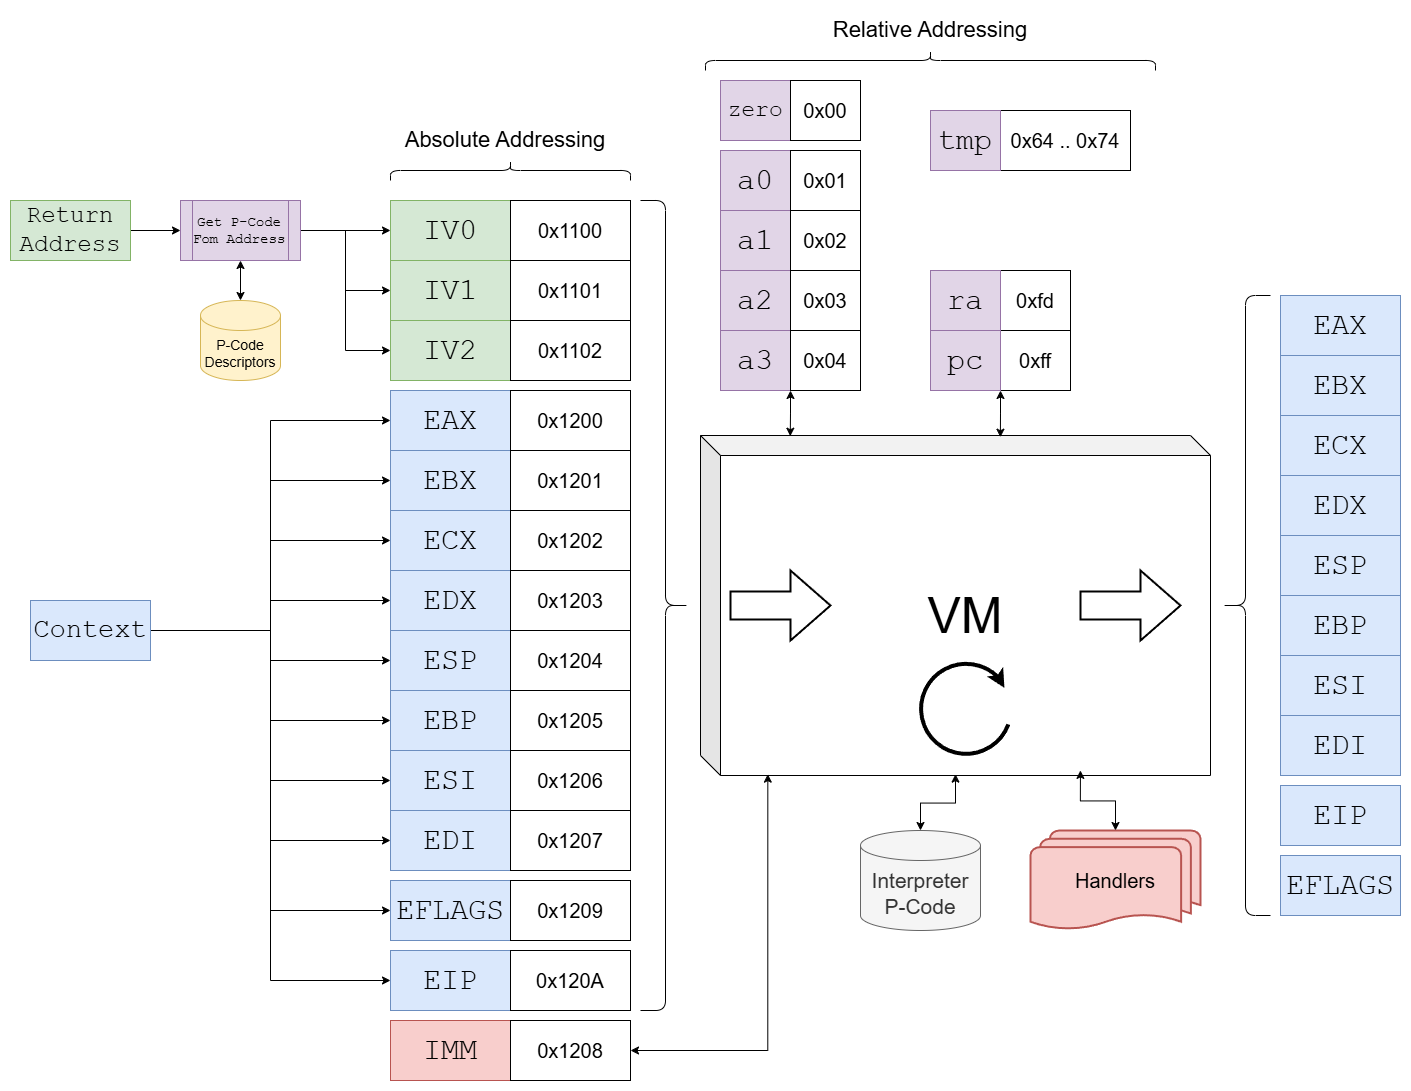
It works roughly in the following manner:
- The return address of the Call in the user code is used as a lookup to retrieve a single P-Code from a list of P-Code-Descriptors. But this P-Code is not directly executed by the VM, it’s rather parsed/interpreted by the static internal P-Code of the VM, hence it’s more like an ‘Initialization Vector’ (IV).
- The IVs and the original registers get mapped into the VM_MEMORY at the given offsets/addresses. One fake-register is added that is used for immediate values, it gets filled by the VM.
- Internally the VM has 4 working/scratch registers
a0,a1,a2,a3, azeroregister that always returns zero, araregister that is used to hold the return address when a subroutine is called, an instruction pointerpcand a few temp-registers. - All in all the instructions and the registers resemble a RISC-like architecture, although it looks like a handful of modifications were made. But I must admit that it was my first time working with the RISC architecture, so it might be possible that not everything is 100% accurate.
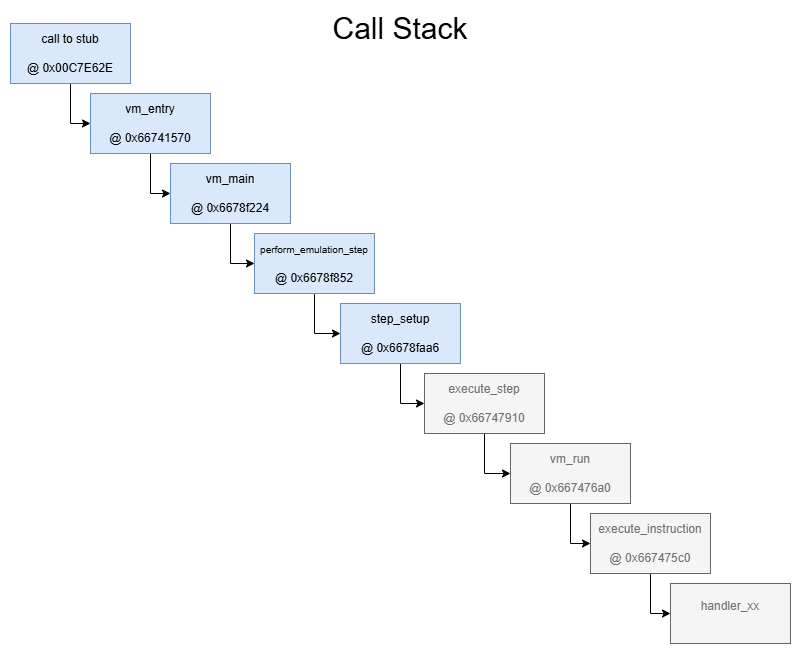
The memory layout is as follows:
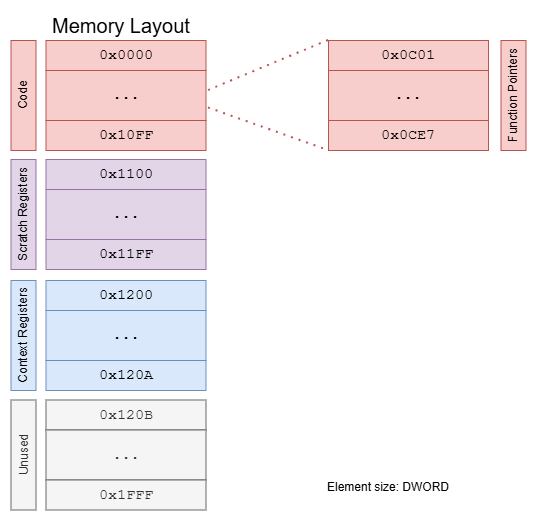
So 0x2000 ‘memory cells’ of size DWORD. Note that the scratch registers are addressed relative in the code, so one needs to add 0x1100 to get to the real address in memory, everything else is addressed absolute. Most of the memory space is unused, for example, the actual code has just a length of 458 (0x1CA) DWORDs.
The extracted raw code section can be found here.
Ok, so much for the overview. Before we can start analyzing the P-Code now, we need to explore the VM in-depth. So let’s get our hands dirty.
Boiling it down
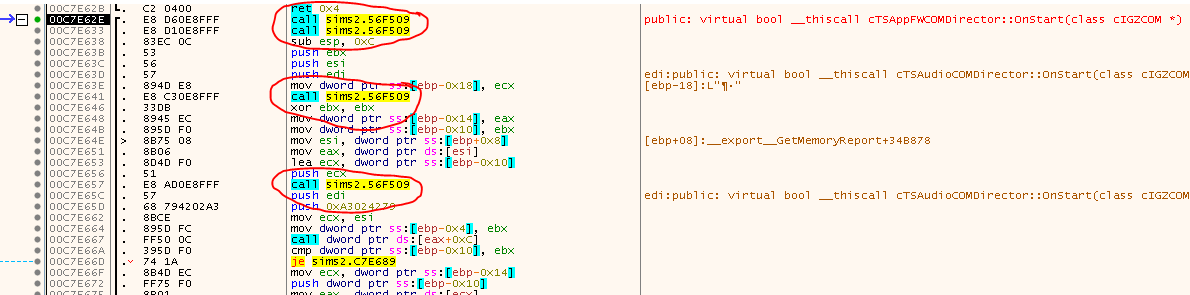
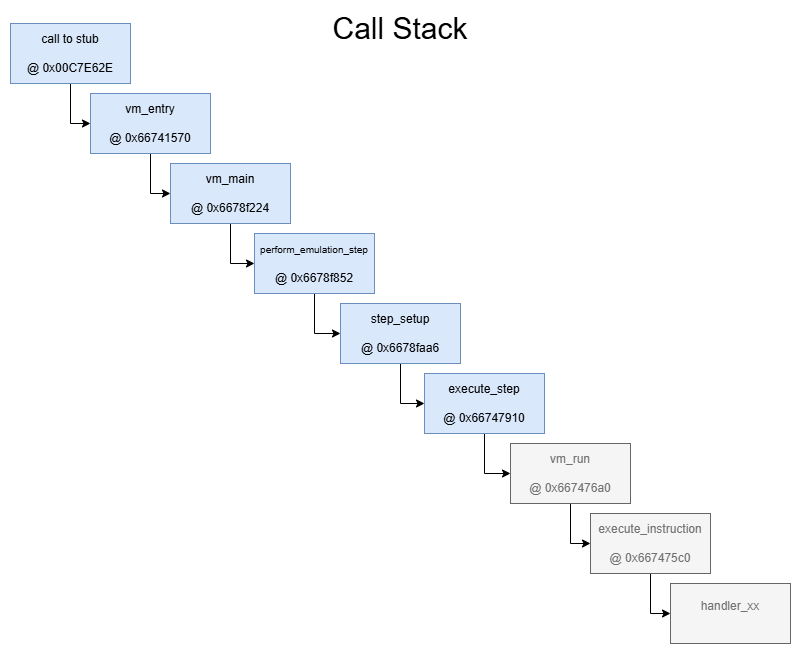
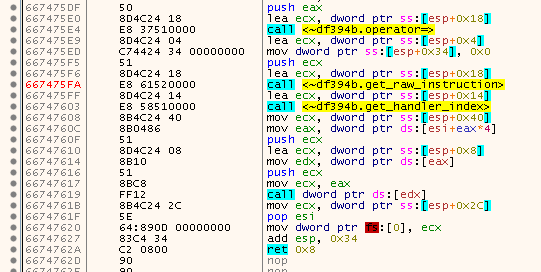
You are here:
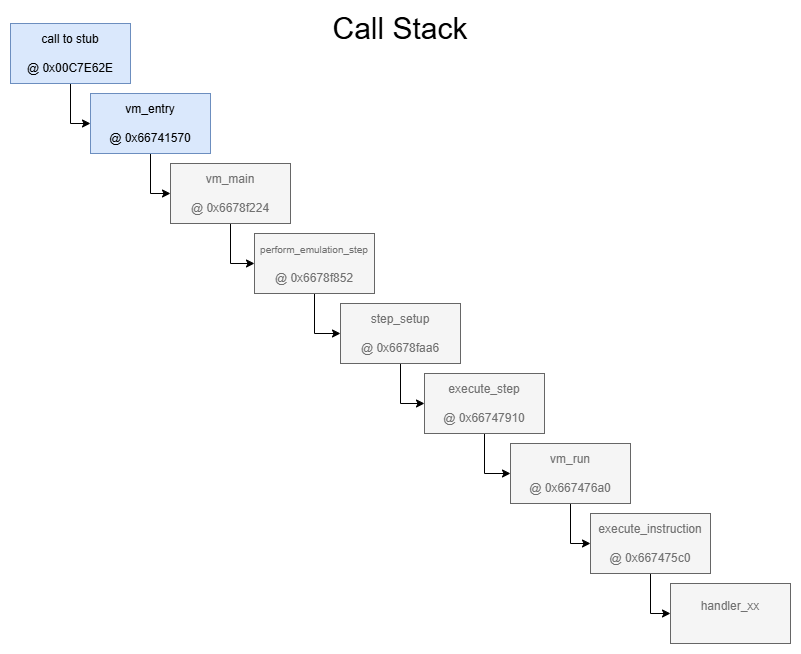
In order to get an idea of what’s going on, let’s dig down the rabit hole one step at a time. Enter the call to 0x0056F509 - located at e.g. 0x00C7E62E, 0x0041290C, 0x004184DF, … - as seen at the beginning of the article and step into a few more times until you land in this function at 0x66741570:
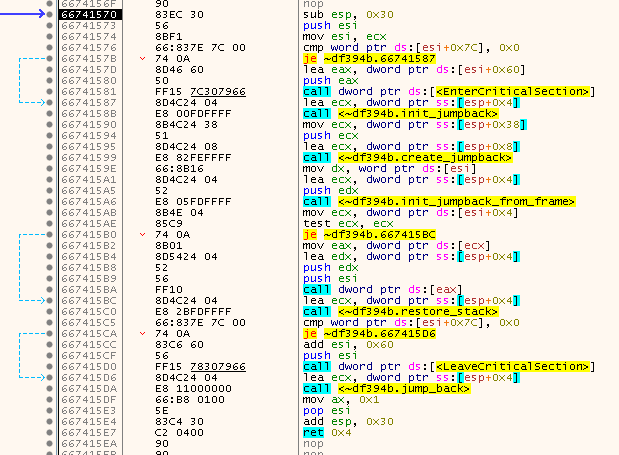
The hardcoded calls are somewhat simple to reverse. They retrieve the ‘context’ that was pushed onto the stack via PUSHFD and PUSHAD and also a jumppad (trampoline) is installed in order to jump back to any arbitrary location after the SafeDisc magic is over.
The C-Equivalent looks as follows:
WORD __thiscall VM::vm_entry(VM *this,STACK_CONTEXT_t *frame)
{
    JUMPBACK_t jb;

    if (this->use_critical_section != 0x0) {
        EnterCriticalSection(&this->critical_section);
    }
    init_jumpback(&jb);
    AutoClass5::create_jumpback(&jb,frame);
    init_jumpback_from_frame(&jb,this->some_bool);
                    /* Calls vm_main at 6678f224 */
    if (this->vm_main != NULL) {
        (*(code *)**(undefined4 **)this->vm_main)(this,&jb);
    }
    restore_stack(&jb);
    if (this->use_critical_section != 0x0) {
        LeaveCriticalSection(&this->critical_section);
    }
    do_jumpback(&jb);
    return 0x1;
}
The definitions of the structs can be found here.
Note that this ‘vm_entry’ is used for other stuff, too. Only the handler function is different. In fact, the stub through which we entered the function is in itself some kind of struct/class-instance. A reference to that struct gets pushed onto the stack as last element. Within the struct, the second element points to the handler function.

But that’s just a minor detail and doesen’t really matter.

The true magic now happens inside the handler-function at 0x6678f224 (vm_main). As I said, there is a lot going on. One of the most important calls happens close to the start of the function:
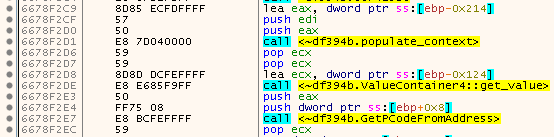
Which roughly translates to:
PCODE_DESCRIPTOR_t *PCode;

populate_context(&ctx_vals,jb);
call_address = ValueContainer4::get_value(&ctx_vals.EIP);
PCode = GetPCodeFromAddress(this,call_address);
Note that ctx_vals.EIP is already an instance of that Value-Class I talked about earlier. populate_context transforms the ‘plain’ values from the stack-context to these Value-Classes. The ‘get_value’ method retrieves back the plain value of EIP.
Inside GetPCodeFromAddress the Call-Address (original value of EIP) is actually translated back to the return address (EIP + 5), then the RVA is calculated by subtracting the Image Base (0x00400000). This RVA is then transformed into a lookup value, simply by calculating the MD5 hash and using the first 4 bytes of that as the lookup.
Something close to that:
uint32_t get_lookup(uint32_t rva)
{
    MD5_CTX_t md5_ctx { 0 };
    char hash[MD5_DIGEST_LENGTH];

    md5_init(&md5_ctx);
    md5_update(&md5_ctx, (char*)&rva, sizeof(uint32_t));
    md5_finalize(hash, &md5_ctx);

    return *(uint32_t*)hash;
}
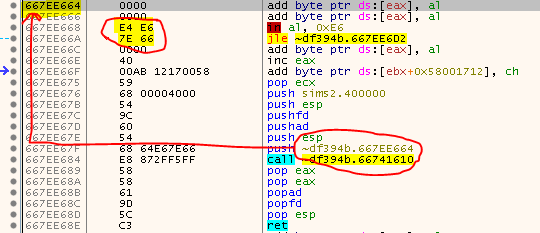
So the Call-Address from the example above (0x00C7E62E) would give us a Return-Address of 0x00C7E633, which has an RVA of 0x0087E633 which results in a MD5-hash of a2701a5560e87540d0eeabbc3a92f005 and thus the lookup would be 0x551A70A2 (watch out for endianess!).
This lookup is then in turn used to find a corresponding - as I called it - PCODE_DESCRIPTOR_t. These descriptors are located in an array that is built during runtime. The pointer to that array is stored at 0x667A9484 (remember that for later!). There are 128 of these descriptors and you can see the search in action in the routine starting at 0x66790FA1 which translates to:
PCODE_DESCRIPTOR_t* GetPcodeDescriptor(uint32_t lookup)
{
    size_t i = 0;
    size_t idx = lookup % 128;

    while (!PCODE_DESCRIPTORS->valid[idx] || GetLookupFromPCode(&PCODE_DESCRIPTORS[idx]) != lookup)
    {
        i++;

        if (i > 128)
        {
            return NULL;
        }

        idx = (lookup + i) % 128;
    }

    return &PCODE_DESCRIPTORS[idx];
}
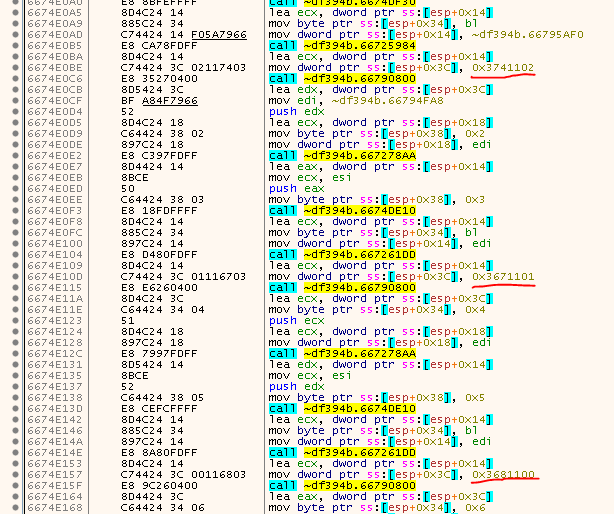
Once we have the descriptor many many instructions follow which arent super interesting. They basically perform two checks. First, they see if a valid PCODE_DESCRIPTOR_t or NULL was returned, second, there are consecutive/multi-sequence/chained-together instructions which are emulated - as the name implies - in a consecutive fashion without leaving the VM. In fact, have a look at the image at the start of this article. There are two calls to the VM. These would get emulated together. But since there is no need to take extra precautions for single/consecutive instructions, we can ignore that.
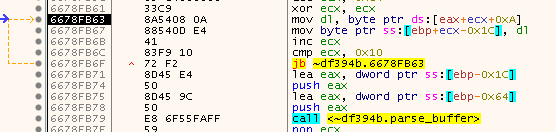
The next routine we need to explore is the one at 0x6678F852 which I named perform_emulation_step, don’t get overwhelmed by all the buzzing that’s going on in there. After renaming a lot of stuff I’m quite sure that this routine actually does not much meaningfull on it’s own, just step over the mess until you land on the routine starting at 0x6678FAA6 (step_setup).
Here we come across multiple Calls to some interesting functions.
First, there is a Call to 0x66769483. This function initializes the VM_MEMORY (to all zeros). The first parameter of the function is the address of VM_MEMORY, second parameter is the size of each element (0x18 Bytes - sizeof(ValueContainer4)), third parameter is the number of elements (0x2000) and the last parameter is the initialization function. So from this we can learn that the VM_MEMORY consists of 0x2000 elements.
The following Call to 0x6674E040 will fill the code section of VM_MEMORY (0x0000 .. 0x10ff). Have a look inside and compare the hardcoded values to the first few bytes of the dump of the code section.

Looks like the content of the code section of the VM was baked into the SafeDisc code.
A few lines down the raod, we finally see something useful:
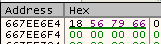
It’s certainly not much, but it’s kinda important! 16 Bytes from the PCODE_DESCRIPTOR_t (starting at byte offset 0xCE) are copied to some buffer. Have a look at the buffer and remember the values:

The function that follows shortly after parses the first 12 bytes as 3 DWORDs (0x00000000, 0x9C5021E4, 0x71C36AC9) and stores them in an array. Directly after that another function is called which definitely deserves our attention!
This is what I reconstructed the function to:
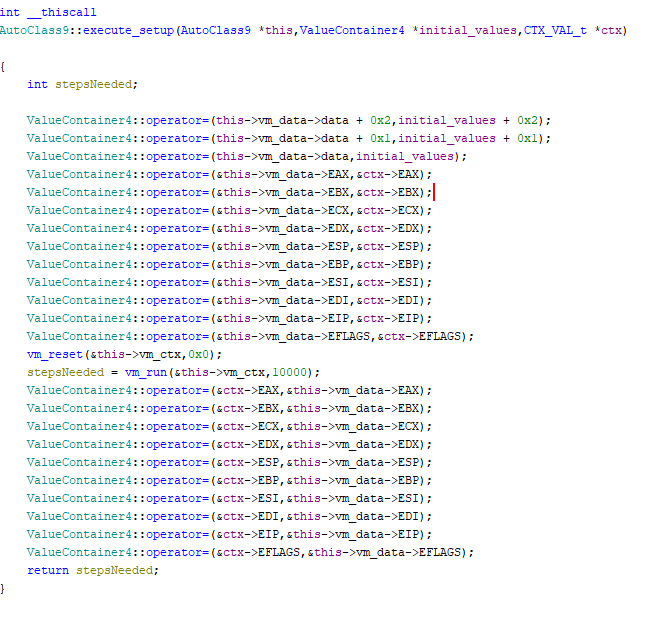
So the three parsed values from the PCODE_DESCRIPTOR_t (0x00000000, 0x9C5021E4, 0x71C36AC9) and all the registers (hence the context) are copied over, then the VM is reset (the internal instruction pointer pc is reset to zero), and finally what looks like the inner VM run-function is reached - Yay!
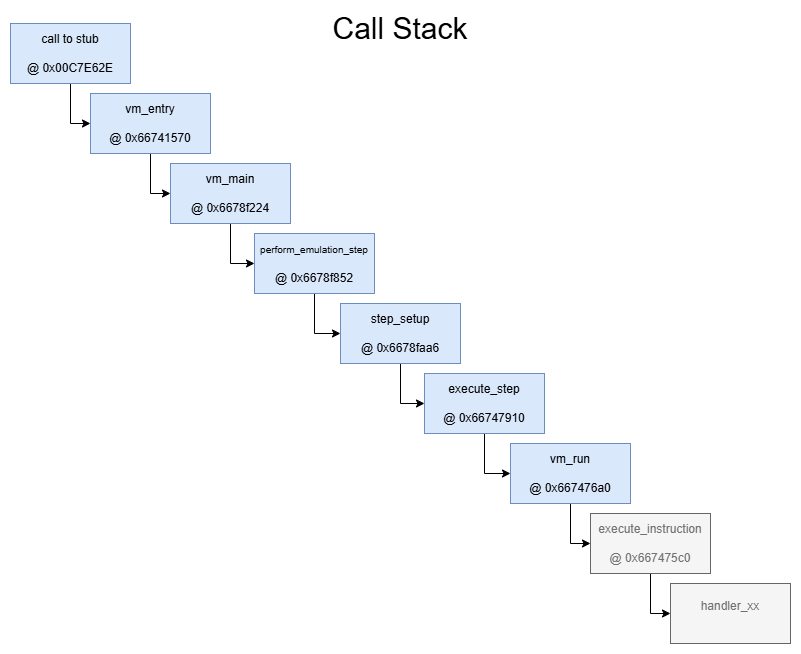
Stepping further into the vm_run function, we see two important things:

This is the exact moment when you can see the unencrypted value of the current code-index (pc-register) and the corresponding Parser-P-Code from the code-section. Note that &ParserPCodes[n].value is not the raw value of the P-Code, it’s a struct/class that holds the value, the struct is quite simple:
struct SimpleValue
{
    struct SimpleValue_VT *vt;
    DWORD value_raw;
};

struct SimpleValue_VT
{
    DWORD (*get)(struct SimpleValue *, DWORD, DWORD, DWORD);
    void (*set)(struct SimpleValue *, DWORD);
};
As you can see, the real value (value_raw) is at index 4 of the struct. This value is XOR-encrypted with 0x3635262f as key.
ParserPCodes[n] itself is one of the ValueContainers we talked about earlier (size: 0x18) and the value member is located at offset 8.
So now that we know where VM_MEMORY is located (0x6682A660) and we know that the memory consists of 0x2000 ValueContainers that hold the underlaying value at offset 8+4, each ValueContainer has a size of 0x18 bytes and the key to decrypt the value is 0x3635262f, we can dump the code section with a simple x64dbg script:
The extracted codes can be found here (code section only)
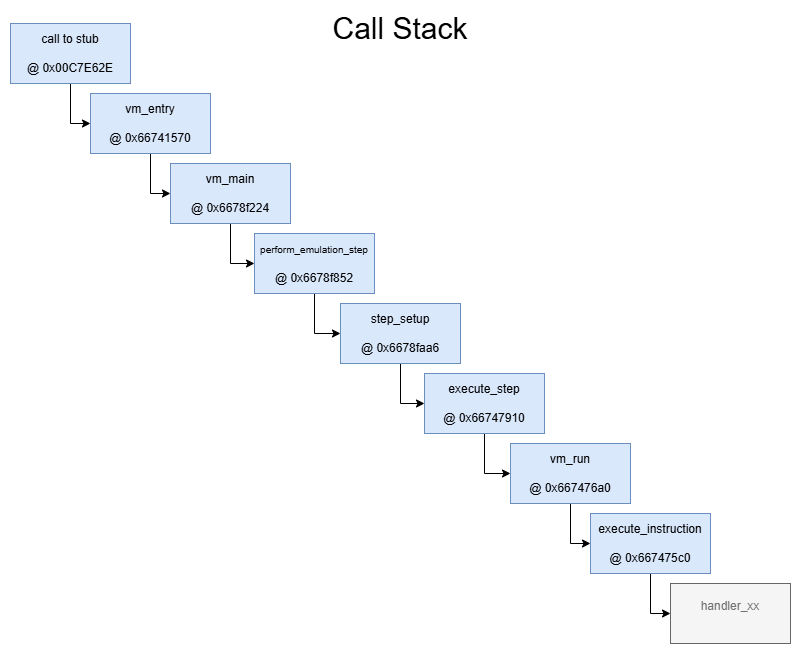
Everything that’s left now is to figure out how we can interpret the code. For this, step into the function located at 0x667475c0 (execute_instruction).
Here we can see 4 function calls:
The first one simply copies the value of the instruction to a temp var. The second function splits the instruction-value into 4 new values. These 4 values are then copied into a struct I named Instruction. The remaining 7 bits are the handler-index (hence the OpCode) which is extracted in the third function call:
struct Instruction {
    BOOL is_immediate;
    DWORD dest;
    DWORD src_high;
    DWORD source_low;
};

Instruction i;

i.is_immediate = (value >> 24) & 0x01;
i.dest = (value >> 16) & 0xff;
i.src_high = (value >> 8) & 0xff;
i.source_low = (value >> 0) & 0xff;

size_t handlerIndex = (value >> 25) & 0x7f;
And finally in the fourth and last call, the corresponding VM-handler is called. In theory there can be up to 128 handlers, but in reality there are only 28.
To not convolute this article more than it already is, I have put the Parser OpCode Reference in another file
Parsing the Parser / Interpreting the Interpreter
Now that we know the meaning of the instructions, let’s try to understand the whole parser by first translating the bytes into more meaningful text.
These are the translated instructions I came up with: Parser Instructions
This is my Interpreter
After some time of looking at the code, I started to understand what was going on:
- IV0 is used as some kind of key by first transforming/shuffling it twice then XORing it with IV2.
- IV0 is then shuffled once more and XORed with IV1.
- The XORed value of IV2 is then split into 3 bytes. One byte denotes the opcode, the other two are the operands. The operands can have the values 0 through A and denote the original registers (located at 0x1200 .. 0x120A).
- IV1 will be used for instructions that have an immediate value and is stored in the IMM register.
uint32_t Transform(uint32_t value)
{
	uint32_t r6F = 0xF0F0F0F0;
	uint32_t r70 = 0x0F0F0F0F;
	uint32_t r71 = 0xFFFFFFFF;

	uint32_t r6C = value & r6F;
	uint32_t r72 = (value ^ r71) & r70;
	r6C |= r72;
	r72 = ((r6C << 15) ^ r71) & 0xffffffff;
	r6C = (r6C + r72) & 0xffffffff;
	r72 = (r6C >> 10);
	r6C ^= r72;
	r72 = ((r6C << 3) ^ r71) & 0xffffffff;
	r6C = (r6C + r72) & 0xffffffff;
	r72 = (r6C >> 6);
	r6C ^= r72;
	r72 = ((r6C << 11) ^ r71) & 0xffffffff;
	r6C = (r6C + r72) & 0xffffffff;
	r72 = (r6C >> 16);
	r6C ^= r72;

	r6C &= 0xffffffff;

	return r6C;
}

uint32_t key_IV2 = Transform(Transform(IV0));
IV2 ^= key_IV2;
char opcode = (IV2 >> 16) & 0xff;
char operandA = (IV2 >> 8) & 0xff;
char operandB = (IV2 >> 0) & 0xff;

uint32_t key_IV1 = Transform(key_IV2);
IV1 ^= key_IV1;
The OpCode Reference can be found here.
Note: These are the OpCodes that get derived from the ‘Initialization Vectors’ (IV). They represent the emulated instructions and should be de-virtualizeable back to x86 assembly. They are not to be confused with the internal static Parser OpCodes of the VM.
Putting it all together
Ok, we finally have all the details to de-virtualize the instructions!
Let’s see that in action. Take the three IV-values we acquired from the P-Code-Descriptor (0x00000000, 0x9C5021E4, 0x71C36AC9) and plug them into the parser:
uint32_t IV0 = 0x00000000;
uint32_t IV1 = 0x9C5021E4;
uint32_t IV2 = 0x71C36AC9;

uint32_t key_IV2 = Transform(Transform(IV0)); // 0x71C36AC1
IV2 ^= key_IV2; // 0x00000008

char opcode = (IV2 >> 16) & 0xff; // 0
char operandA = (IV2 >> 8) & 0xff; // 0
char operandB = (IV2 >> 0) & 0xff; // 8

uint32_t key_IV1 = Transform(key_IV2); // 0x9CA0618B
IV1 ^= key_IV1; // 0x00F0406F
So, we have an Opcode of 0 (MOV), operandA is 0 (EAX), operandB is 8 (IMM) and the IMM register has a value of 0x00F0406F. Which means that the instruction boils down to:
MOV EAX, 0x00F0406F
Let’s do that one more time. For the second call at 0x00C7E633 (see image above) we get the following IVs: 0x00000000, 0x634968BF, 0x71C160C9. That results is an opcode of 2 (CALL), an operandA of 10 (EIP), an operandB of 8 (IMM) and IMM has a value of 0xFFE90934. So we get:
CALL +0xFFE90934
Or, adjusted to the real address:
CALL 0x00B0EF6C
Which finally explains why we were ending up in some random subroutine.
Nearly there
Phew! That was one hell of an article! Trust me, we can already see the finishline, but we need to tackle two more things. First, while I was looking through the logfile, I realized that there was one very strange location that was restored to faulty code:

The other thing I was afraid of excited for was the fact that the original release by MONEY was broken and was therefore nuked, so there was something lurking in the shadows. But we will see this in the final article ;)
tags: The Sims 2 - Game Cracking - Reverse Engineering - SafeDisc - VM - Virtual Machine - DLL Injection - Self Debugging