Grand Theft Auto: Vice City
by OldGamesCracking
Game Specs
| Name | Grand Theft Auto: Vice City |
|---|---|
| Release-Date | 05/2003 |
| Redump ID | 19050 & 10500 |
| Protection | SecuROM v4.84.69 |
| Cracked under | Win 10 |
| Tested under | Win 10 |
| Scene-Crack by | FAIRLIGHT |

Needed Tools:
- x32dbg
- The original Game-CD of course ;)
Disclaimer
- The games are cracked for educational purpose and to regain compatibility with modern systems
- The games are more than 20 years old and can be found freely on the net via e.g. archive.org
- No parts of the game are distributed
How to Crack
After having cracked GTA 1, GTA 2 and GTA 3 it just felt natural to also have a look at one of my favorite games of all times: Grand Theft Auto: Vice City. This game has nearly the same SecuROM version as the game in the previous article so it shouldn’t be too hard to adapt the gained knowledge.
Using the GetCommandLineA trick we find the OEP quite fast which is at 0x00667BF0 and via the script from the last article we can break there easily. Having a look at the intermodular calls reveals that not much has changed and we can also use the Import Fixer Script from last time. The only questions remains: Where is the IAT? Luckily for us, some original imports are still intact and we can find them via a rightclick/Search for/All user modules/Intermodular calls. Watch out to only have a look at CALLS that are within the .text section of the OEP.
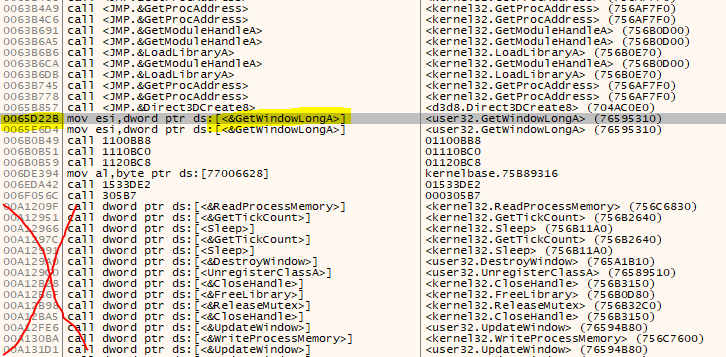
Then, after a bit of scrolling up and down the dump, I figured out that the IAT must be starting at 0x006F23C0 with a size of 0x2E0. To find the start/end of the IAT, have a look at the addresses. Are they within external modules? Usually you get somewhat of a ‘visual change’ in the data or you hit the page border.
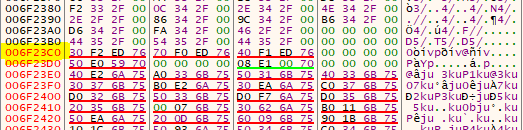
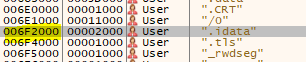
See how all values before 0x006F23C0 start with 00 and after that with 7x? Another good method is to see if there is a .idata section, ususally the IAT is within that:
With the imports fixed, it’s time to dump the game… Well, we hit a somewhat unexpedted roadblock:

What’s that about you might ask. Well, I asked myself the same question and tried different things. At one point I tried to dump the unaltered game.exe right at the start which should in theory give us the original game.exe back but even then I got this error. Also checking the PE file in pe-bear did not reveal anything unusual at first sight. So it looked like the problem was with Scylla itself. I sifted through my old tools collection and tried ImpREC just to realize that back in the days we actually used Olly itself (with a plugin?) to dump the exe back to disc and used ImpREC just to fix the dumped exe. Since I was too lazy to install Olly and adapt my script, I took the approach I should have taken much earlier: Simply read the source code of Scylla. For that I downloaded the Scylla.exe and started it in a separate instance of x32dbg. The error message is on this line. So it looks like isValidPeFile fails. Let’s have a look at that. The values in there (pDosHeader and pNTHeader32) are actually generated in getDosAndNtHeader and when we have a look at that, we can start to see that the only way this can fail is if e_lfanew is >= size. So, let’s see what size is used here. The function we are interested in is readPeHeaderFromProcess. Size is set to whatever getInitialHeaderReadSize returns. And there we finally get the first part of the answer:
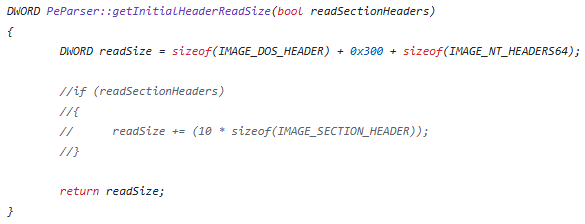
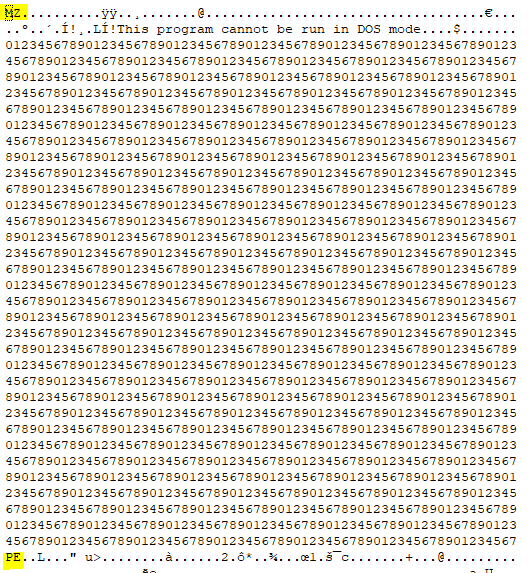
So, if the DOS stub is larger than 0x300 bytes, Scylla will simply fail to parse the file properly. Having a look into the game.exe we see that 0x800 bytes of junk data have been added to the DOS stub. Probably as a means to fool dumping tools:
So how can we fix this? Well, we could recompile Scylla with a larger value, but I was too lazy for that. So I went with the much simpler solution: Patching the exe. Luckily the used buffer is created on the fly so we can change the size without a problem. I spare you with the details, with the following patches the buffer will be 0x1000 bytes instead of 0x448:
>scylla_x86.exe
00026CD6:48->00
00026CD7:04->10
00026CEB:48->00
00026CEC:04->10
00026CFF:48->00
00026D00:04->10
00026D3A:48->00
00026D3B:04->10
00026D8C:48->00
00026D8D:04->10
00026E0F:48->00
00026E10:04->10
00026E27:48->00
00026E28:04->10
00026E64:48->00
00026E65:04->10
Patches are for v0.9.8
With that out of the way we can finally dump the game.exe and have basically defeated SecuROM once again.
Bonus Points

If you would like to create a real No-CD-Crack, we can use the same trick from GTA 3, so let’s break on the classic GetDriveTypeA and have a look around:
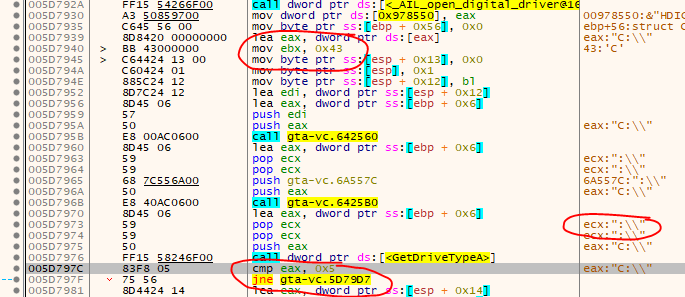
Well, that’s easy isn’t it?
- Change ‘C’ to a ‘.’
- Change ‘:\’ to ‘\’
- Patch the JMP
- Don’t forget to copy all Audio files from disc to the install dir
Or in other words:
>gta-vc.exe
001D7941:43->2E
001D797F:75->90
001D7980:56->90
002A557C:3A->5C
002A557D:5C->00
That was kinda easy. Much easier than GTA 3 ;)
tags: GTA VC - Vice City - Grand Theft Auto: Vice City - Game Cracking - Reverse Engineering - SecuROM