Stronghold Crusader
by OldGamesCracking
Game Specs
| Name | Stronghold Crusader |
|---|---|
| Release-Date | 09/2002 |
| Redump ID | 52616 |
| Protection | SafeDisc v2.70.030 |
| Cracked under | Win XP |
| Tested under | Win XP & Win 10 |
| Scene-Crack by | RAROR1911 / CLASS |

Needed Tools:
- Good Old PC (Windows XP)
- x32dbg
- Ghidra
- HEX-Editor
- ProcMon 3.1 (Win XP compatible)
- PE tool of your choice (e.g. PE-bear)
- The original Game-CD of course ;)
- Compiler, Dev-IDE and stuff (e.g. VisualStudio)
- The previous articles on SafeDisc
- w4kfu’s Article
- Koffeinhaltige Kaltgetränke
Disclaimer
- The games are cracked for educational purpose and to regain compatibility with modern systems
- The games are more than 20 years old and can be found freely on the net via e.g. archive.org
- No parts of the game are distributed
How to Crack
In this article I will try to move away from my SafeDisc-x32dbg-Script and try to perform the whole Import/Nanomite-fixing-process from within the injected DLLs which will hopefully speed up things a bit ;) If you haven’t, I highly recommend reading the Stronghold Deluxe Article first to get a general understanding of the self-debugging techniques (Nanomites) used in this version of SafeDisc.
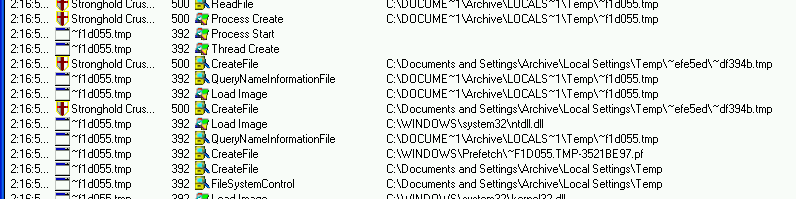
As always, let’s first watch the situation from a bit further away and just let ProcMon make some notes in the background ;)
As we can see, the situation is still as we know it from Stronghold Deluxe. Four files are created in the temp folder and one of them (~f1d055.tmp) is started as a new worker process:
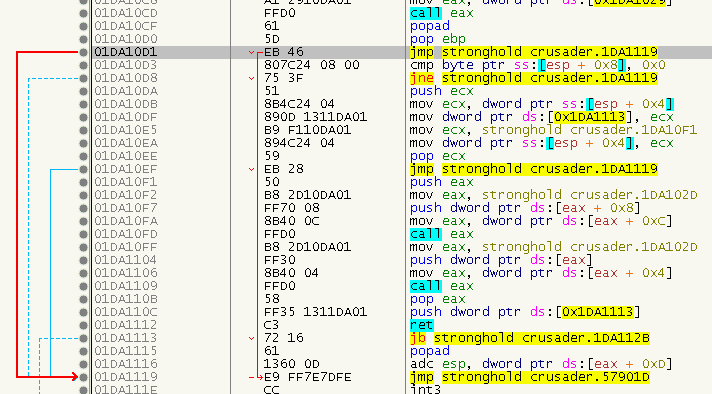
Also, the OEP can still be found via searching for a “CALL EAX; POPAD; POP EBP; JMP XXX” (FFD0 61 5D EB) at the Entry Point, then following the jump twice (OEP: 0x0057901D):
So as a first step, let’s try to stop the game.exe at the OEP. For that, the following steps are needed:
- Inject a DLL into game.exe and hook CreateProcessA
- Once the hook fires, inject a second DLL in the worker.exe
- Hook a function that will be called after the game.exe was fully decrypted
- Once the hook fires, alter the instruction at the OEP to an INT3
- When the INT3 triggers. The game.exe will be suspended and the worker.exe can handle the further steps
The only ‘complicated’ part in this setup will be the second hook as we don’t know which function to hook at the moment. Typicly one can use VirtualProtect for that which I have used also. Just check if the OEP is within the address range of [lpAddress, lpAddress+dwSize]. I stored the original byte at the OEP (0x0057901D) that gets replaced with the INT3 to the location of the Entry Point of the game.exe (0x01DA105E) since the worker.exe can figure out this address on it’s own via the headers and we do not need to acquire any additional buffers.
That’s already it for the dll_game.dll this time, everything else will be done in the dll_worker.dll
In the dll_worker.dll we first need to figure out the OEP of the game.exe so we can distinguish between an INT3 from within the SafeDisc code and the INT3 at the OEP. We will do this from within a hook to DebugActiveProcess, but this time we read the address of the OEP from the image on the disc (game.exe), as this is somewhat easier. Have a look into GetProcessData for details on that. After we acquired the address of the OEP, we can hook WaitForDebugEvent and wait for ExceptionAddress to point to the OEP.
When the INT3 triggers, we can fix the game.exe from within the worker.exe and once we are done, we detach from the process as debugger so that we can attach x32dbg for a final inspection and to dump the game. The source code of the two DLLs is linked at the end of the article.
The steps that the worker-DLL perfoms to fix the game.exe are the following:
Fixing the intermodular Calls
This one is actually quite easy and straight forward. We go though the Text Section and look for CALLS (FF 15) that have their thunk within the IAT. If the called address is within a user module, it’s very likely a SafeDisc stub. This is what the SafeDisc stub will look like:
To get to the original address, just do the following:
- Place EIP on the CALL to the stub
- Single-step until we land on a PUSHFD
- Step over that
- Then place a Hardware Breakpoint on the Stack-Top
- Run freely
- When we break, we should be at the end of the stub, so just Single-step until we land on a RET
- The proc address is on the top of the stack
This method is a direct re-creation of what I did with my script in the previous articles, so for more details, have a look at the script and the previous articles.
Instead of fixing the calls right away, we will first remember it in a linked list and write the fixed IAT and the calls later. For more details have a look at FixIntermodularCalls and the underlaying FixCalls_Generic.
Fixing the relayed User Code Calls
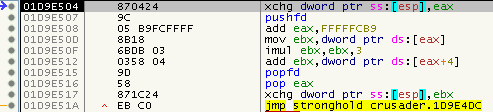
If you’ve read the Stronghold Deluxe article, you may remember the relayed calls to user code. They consist of a setup stub:

followed by a lookup stub:

and then the classic stub:
To fix them, this is what I did:
- Find the lookup stub via a pattern (B8????????5903C18B00FFE0)
- Find setup stub by checking all CALLs (E8) and checking which one calls the lookup stub
- Go through all calls again and check which ones call the setup stub
From there we can use the same trick as before:
- Place EIP on the CALL
- Single-step until we land on a PUSHFD
- Step over that
- Then place a Hardware Breakpoint on the Stack-Top
- Run freely
- When we break, we should be at the end of the stub, so just Single-step until we land on a RET
- The proc address is on the top of the stack
At one point I faced the same issue as I had with all the SafeDisc versions before: CALLs after a RET:
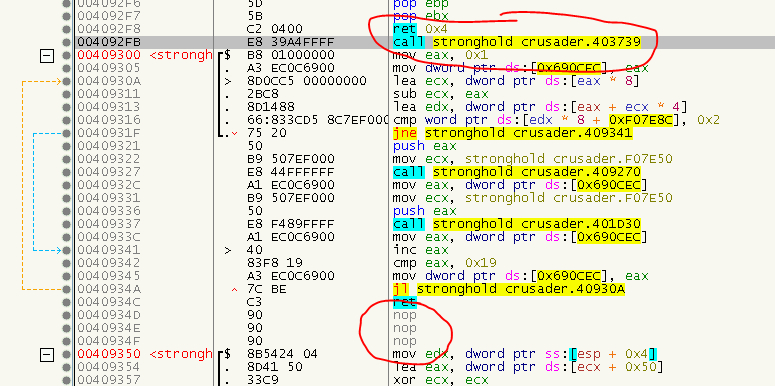
My current theory is that they were placed in the empty space between compilation units that usually gets filled with NOPs (or INT3s or zeros). If the space is larger than 5 Bytes, a CALL was placed there and if we try to restore the CALL, it first looks like everything is working normal, but upon the next valid CALL, the CALL address is ofsetted by 6 bytes. So either these CALLs were never intended to be called or they are placed there to fool us. Anyways, as always, let’s add a check to not repair a CALL directly after a RET (C3 and C2). For more details, see FixRelayedUserCodeCalls.
Register CALLs
A different way to CALL a remote procedure is via a Register CALL:
They are easy to fix, the only challenge beeing the different sizes (e.g. a MOV EAX is 5 bytes, a MOV EBX is 6 bytes). Besides that the algorithm is nearly the same as for the ‘normal’ CALLs:
- Go through the Text section and search a MOV for each register
- Check if the target is within the IAT
- If so, perform the same steps as seem before
For the details, see FixRegisterCalls.
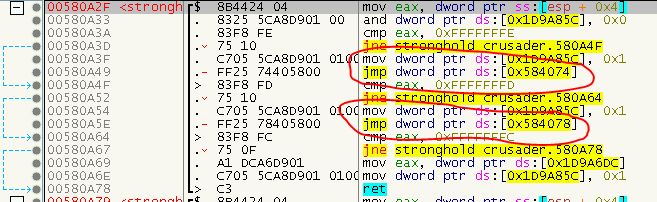
JMP CALLs
A third type of CALLs are actually JMPs that jump to a location in the IAT, hence also land in a remote procedure. We can easily fix them via the methods we already have, we just need to adapt the searchpattern (FF 25).
For the details, see FixJMPCalls.
Far JMP as CALL
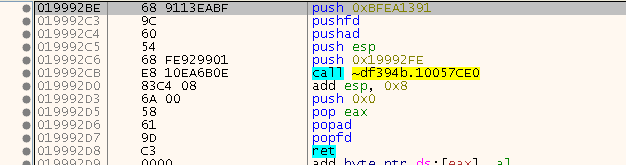
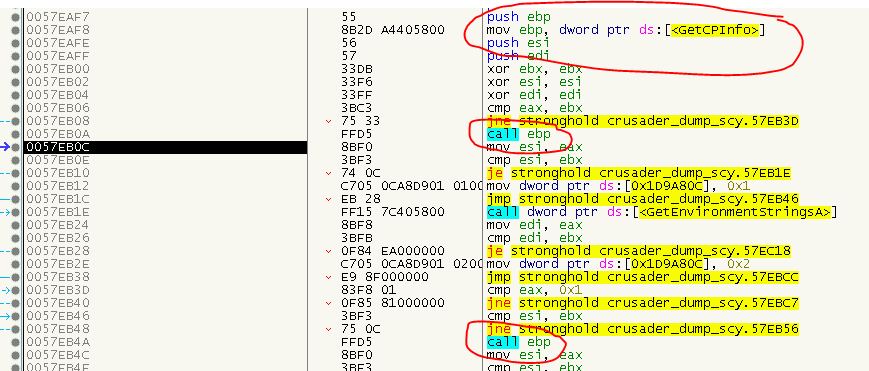
Another type of intermodular CALLs in disguise are far JMPs (E9) that go to the SafeDisc section:

Then perform a call and a lookup:

And then end up in the stub. Again, they are easy to fix. Simply search for all JMPs and check if they go to the SafeDisc section. Place EIP on the CALL, single step until PUSHFD, proceed as seen before.
For the details, see FixFarJMPCalls.
Nanomites
For a more indepth explanation on Nanomites have a look at the Stronghold Deluxe article.
Last time, I used W4kfu’s approach to simply spawn a thread on the Nanomites to let the SafeDisc-Worker do the job for us.
That worked somewhat well and I got to the point where the game was probably 95% Nanomite-free, I could start up the game and it would play fine. But upon scrolling through the code, I sometimes found new instructions that would cause an exception, hence a Nanomite and there were also quite a few whacky checks needed to make sure to not spwan a thread on something that might look like a Nanomite in the first place, but turned out to be random data in the end, since this would stop the SafeDisc worker from repairing the Nanomites at all. For example have a look at the following instruction:

If you use a searchpattern to find three consecutive INT3, you will find this address which actually contains a harmless MOV EAX. And if you spwan a thread on too many of these false-positives, the worker completely stops recovering the Nanomites.
So after many hours of painfully stitching together spaghetti code, I decided that it was time to tackle the situation from a completely new perspective: Reverse Engineer the Nanomite code itself ;)
Luckily for us, we can use Ghidra these days which was a tremendous help. I guess it would have taken me ages to accomplish the same result with just a debugger. Ok, so let’s start the deep dive on the Nanomites of SafeDisc ;)
Bubble Up
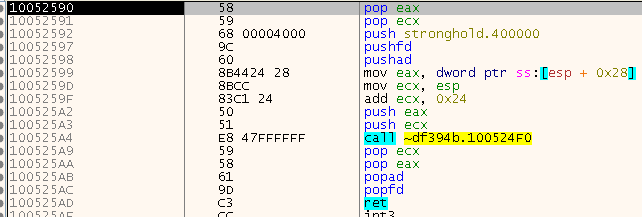
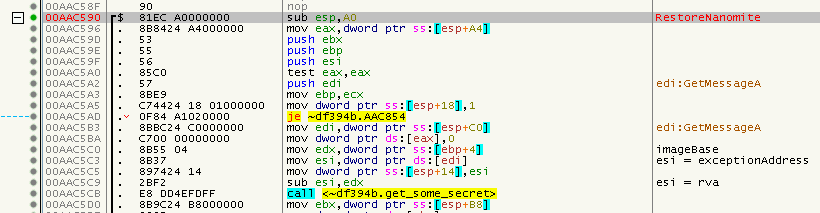
I had no concrete idea where to look for the Nanomites and the underlaying code, so I did what I had done before: Install some hooks and try to get a better understanding of the situation. The ones I started with were the ones I had previously hooked because I knew they were somewhat related to the Exception->Repair workflow: ReadProcessMemory, WriteProcessMemory, ContinueDebugEvent, WaitForDebugEvent, GetThreadContext, SetThreadContext. Since I could open the worker.exe in the debugger, I was able to climb up the callstack and help Ghidra to point a few function pointers to the right location. After a few hours of renaming, retyping, reconstructing structs, unions and classes things started to get much clearer. Luckily, all I really needed was ~df394b.tmp (SecServ.dll) and the routine that is located at 0x1002c590 (Ghidra) / 0x00AAC590 (x32dbg), I called it RestoreNanomite.
One step after the other
I had added a lot of debug output to my injected DLL, so I was able to see where it tried to spawn a thread on a possible Nanomite etc. which helped me to understand the SafeDisc code a bit better. The first thing I found out is that RestoreNanomite receives (as the last parameter) the address of where the exception happended. From that, the ImageBase is subtracted to get the RVA, probably to also work with ASLR. Then, some secret is calculated from three values. My guess is that two of these values do not change across different games and one is unique for each game, but we will see that in the future. You can find the code right at the start of RestoreNanomite in the first call at 0x00AAC5CB:
The code in the routine looks like the following (simplified):
DWORD get_secret(DWORD gameSecret)
{
    return 0xE50ECF00 + gameSecret;
}
The gameSecret here is 0x000000F7. Later, the returned value is further changed:
secret &= 0xffffff00;
secret ^= 0x72894583;
The mask is actually only applied if there was no previous invalid Nanomite (Which is what we want :D). So, we can simplify this to:
secret = ((0xE50ECF00 + 0x000000F7) & 0xffffff00) ^ 0x72894583;
Or in other words:
secret = 0x97878A83;
This value is then multiplied (integer, 32 Bit) with the rva, which will result in the final secret (or better said, the salt as we will see):
DWORD secret = 0x97878A83 * rva;
The corresponding code can be found a few lines below:

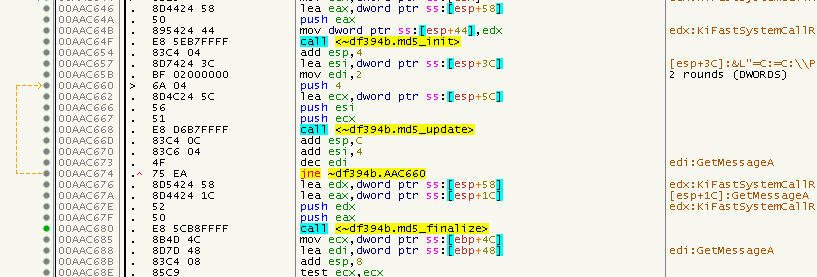
The RVA and the salt are then placed in an 8 Byte long buffer and then 3 functions follow. Via searching the net for some constants that are used in the functions, I was able to identify them as classic MD5 hashing routines. So we end up with:
BYTE buf[2 * sizeof(DWORD)];
*(DWORD*)&buf[0] = rva;
*(DWORD*)&buf[sizeof(DWORD)] = salt;

MD5_t md5;
BYTE hash[16];

md5_init(&md5);
md5_update(&md5, buf, sizeof(buf));
md5_finalize(hash, &md5);
In the real code, the two DWORDs were hashed one after another, but the above code is equivalent:
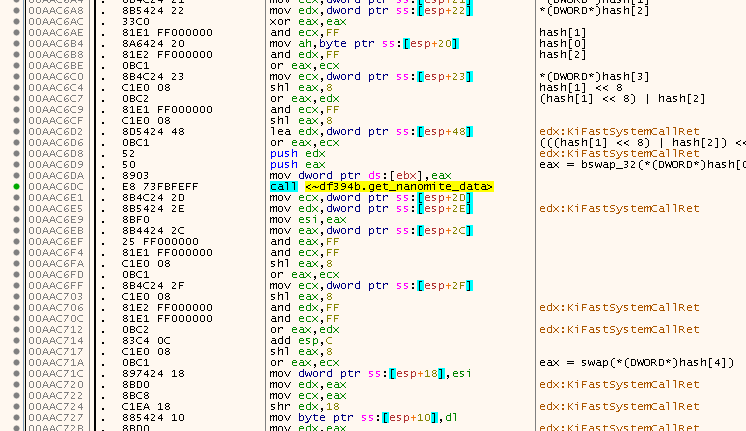
Then some shuffling-around of the bytes in the hash buffer takes place, which turned out to be a complicated version of the following code:
DWORD lookupKey = _byteswap_ulong(*(DWORD*)&md5.digest[0 * sizeof(DWORD)]);
DWORD decryptKey = *(DWORD*)&md5.digest[1 * sizeof(DWORD)];
DWORD unknown = *(DWORD*)&md5.digest[2 * sizeof(DWORD)];
DWORD checksum = *(DWORD*)&md5.digest[3 * sizeof(DWORD)];
So actually nothing special. The hash is simply divided into 4 DWORDs, but the lookup key is in big-endian byte order. We will see their meaning in a short moment. Once the lookupKey is extracted, a CALL at 0x00AAC6DC follows which is where all the fun stuff happens and which took me the longest time to understand.
I will spare you with the cruel details, but this is what happends:
The lookupKey is searched within a binary search tree. The nodes of the tree look as follows:
typedef struct node
{
    struct node *left;
    struct node *mid;
    struct node *right;
    DWORD nodeValue;
    BYTE *data;
    BOOL someBool;
} NODE_t;
Judging by the general appearence of the node structure, I think it’s some kind of Red-Black tree or 2–3–4 tree, but I’m not an expert on trees ;) All we need to know is that a valid Nanomite will always be found in the tree and if so, the pointer to the data buffer is returned which points to a 16-Byte array.
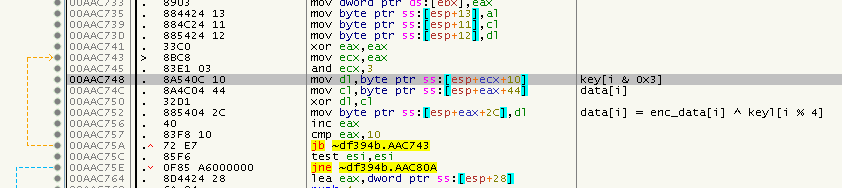
This array is then decrypted via the following algorithm:
for (SIZE_T b = 0; b < 16; b++)
{
	data[b] = data_encrypted[b] ^ ((BYTE*)&decryptKey)[b % 4];
}
They decryptKey is the one we saw earlier (bytes 4..7 from the hash). You can see this in action starting at 0x00AAC743:
So, what have we actually decrypted? The 16 bytes are another struct of the following form:
typedef struct
{
	BYTE size;
	BYTE offset;
	BYTE unknown0;
	BYTE data[7];
	BYTE unknown1;
	BYTE unknown2;
	DWORD checksum;
} NANOMITE_DATA_t;
The checksum member at the end should be the same value as the checksum we extracted from the hash. The data array will hold the original stolen bytes and the size member will determine how many bytes have been stolen. The offset member can be used to write the stolen bytes not to the exact address of the exception but a few bytes before that, but was always 0 in my case.
So, everything thats left to do now is actually:
WriteProcessMemory(hProcess, exceptionAddress - data.offset, data.buffer, data.size, &bytesWritten)
Easy, right? Wonder why this took me so long to figure out :D But three questions remain:
- Where actually is said search tree located?
- How can we traverse it ourselves?
- How do we get the original addresses of where the Nanomites are located?
The first two questions took me quite some time to figure out since I was unsure if it really was just a simple binary tree. When I dug deeper in the code, I realized that the tree is created during runtime and that there is an underlaying array from which it is constructed. The array is simply 100 entries of the following form:
typedef struct
{
	DWORD nodeValue;
	BYTE data[16];
} NANOMITE_RAW_DATA_t;
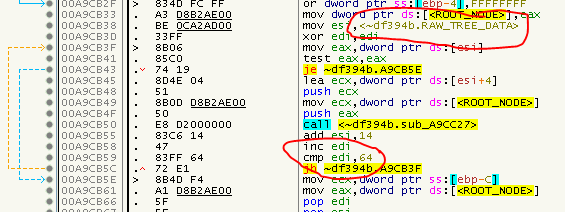
So basicly the nodeValue (lookup/key) followed by the 16 encrypted data bytes. How do I know it’s 100? You can find that value hard-coded in the routine starting at 0x00A9CAFB which is the routine that will build up the tree and iterated over the raw data array. You will also find the starting address of the array there:
The array itself is not encrypted, you can have a look at it with a hex editor at raw file offset 0x56AC:
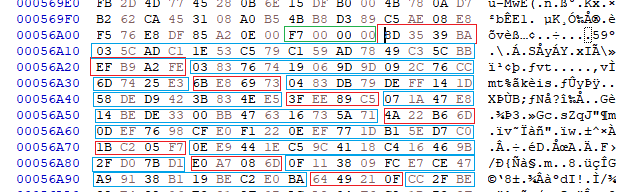
As an example, the address associated with the first lookupKey (0xBA39358D) is 0x0047E072. Why?
Because:
DWORD ExceptionAddress = 0x0047E072;
DWORD ImageBase = 0x00400000;
DWORD RVA = ExceptionAddress - ImageBase; // 0x0007E072
DWORD Salt = 0x97878A83 * RVA; // 0xDD234E56

BYTE buf[2 * sizeof(DWORD)];
*(DWORD*)&buf[0] = RVA;
*(DWORD*)&buf[sizeof(DWORD)] = Salt;
// 72 E0 07 00 56 4E 23 DD

MD5_t md5;
BYTE hash[16];

md5_init(&md5);
md5_update(&md5, buf, sizeof(buf));
md5_finalize(hash, &md5);
// BA 39 35 8D 06 5C AD 78 D1 0D B3 B8 4F 9F F1 C3

DWORD lookupKey = _byteswap_ulong(*(DWORD*)&md5.digest[0 * sizeof(DWORD)]); // 0xBA39358D
DWORD decryptKey = *(DWORD*)&md5.digest[1 * sizeof(DWORD)]; // 0x78AD5C06
DWORD checksum = *(DWORD*)&md5.digest[3 * sizeof(DWORD)]; // 0xC3F19F4F

BYTE data[16];

for (SIZE_T b = 0; b < 16; b++)
{
    // encrypted: 03 5C AD C1 1E 53 C5 79 C1 59 AD 78 49 C3 5C BB
    // decrypted: 05 00 00 B9 18 0F 68 01 C7 05 00 00 4F 9F F1 C3
	data[b] = data_encrypted[b] ^ ((BYTE*)&decryptKey)[b % 4];
}

NANOMITE_DATA_t *nm = (NANOMITE_DATA_t*)data;

// nm->size      : 5
// nm->offset    : 0
// nm->data      : B9 18 0F 68 01 (C7 05)
// nm->checksum  : 0xC3F19F4F
By the way, the gameSecret (0x000000F7) I talked about earlier is located directly in front of the raw data (marked in green).
Before:

After:

As you can see, since we only care for a matching nodeValue, there is no need to build or traverse a searchtree, we could actually perform a sequential search on the raw data array. As for the last question, on how we can get back the original addresses of the Nanomites, there is no simple answer. We need to check every address in the text section, calculate the hash and search for the lookup value. Luckily today’s computers are quite fast and we can speed up things a bit if we rule out (some) instructions that will not produce an exception. But on my machine that was not needed since the whole process takes about five seconds. The only optimization I made to prevent a sequential search was to use a simple hashmap to make the lookup in O(1).
As promised, you can find the source code of both DLLs here:
To inject them, use the Simple Injector I created for Stronghold Deluxe.
So as you can see - if you have a look at the code - it’s actually possible to fix a SafeDisc v2.7 protected game without any inline assembly and tedious guesses if a byte might or might not be a Nanomite ;) The only thing that’s missing right now is to automaticly find the address of the raw Nanomites, at the moment, I hard-coded them.
tags: Stronghold - Stronghold Crusader - Game Cracking - Reverse Engineering - SafeDisc - Nanomites - DLL Injection